
How to Set Up Peer-to-Peer Fundraising - A Guide for Schools
What are Peer-to-Peer Fundraising Teams?
Peer-to-peer (P2P) fundraising teams allow your school to host a fundraising campaign where participants create their own fundraising pages to raise money on behalf of your school. Teams can be organized by grade level, classroom, sports teams, clubs, or any other school group, making it perfect for events like fun runs, spirit weeks, or annual giving campaigns.
Setting Up Your School's P2P Campaign
1. Create Your Campaign Foundation
Access your campaign setup:
Log into your Zeffy dashboard on a computer
Click "Fundraising" in the left menu, then "Campaigns"
Click "+ New form" and select "Peer-to-Peer"
Add your general information:
Create a compelling form title (e.g., "Lincoln Elementary Fun Run 2024")
Select your language
Set your overall campaign fundraising target
Add a description explaining your school's fundraising goals
2. Configure P2P Settings for Schools
Customize team and participant options:
Enable team creation to allow grade levels, classrooms, or clubs to create team pages
Enable individual participant pages for students who want to fundraise independently
Customize the welcome message that will be sent to all fundraisers
Important for schools: You can choose to have teams only, individuals only, or both depending on your fundraising strategy.
3. Set Up Preset Teams (Recommended for Schools)
For better organization and control, create your teams in advance rather than allowing open registration:
🎥 If you prefer a visual walk-through we have a great video walking you through how to pre-set up a team here!
Go to your P2P campaign form by clicking the three dots next to your form and select "View form"
Click the "Fundraise" button to start creating teams
Click on "Create teams"
Create separate teams for each:
Grade level (e.g., "Grade 3 Team," "Grade 4 Team")
Classroom (e.g., "Mrs. Smith's Class," "Mr. Johnson's Class")
Activity group (e.g., "Soccer Team," "Drama Club")
Important: Use the actual name and email addresses of team leaders (teachers, coaches, parents) to enable easy communication.
If you would like the leader to be able to fundraise in their own name, enable the "I will be joining the team"
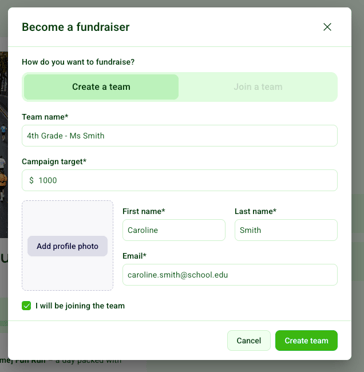
Once you've added all of your teams, you will need to remove the "Fundraise" button on the form. You can do this by manually modifying the URL of your form, before sharing it to your donors. Add this to the end of your form's URL to hide the "Fundraise" button:
?noFundraise=True
If you accidentally created the teams using your own email, your team leaders won't be able to edit their form or receive an email when a student joins or a donation is made.
You can't change the email associated with the team, and will instead have to delete the team and then create a new team.
You can read how to do this here: Delete or edit a team or participant page from a peer-to-peer campaign
4. How Students Can Join a Team
Method 1: From the front page of your P2P campaign
Once you create your form, you can go to the "Share" section of your form editor to access your "Sharing link".
You can send this to your teachers and students. Remember to add ?noFundraise=True at the end of the URL to avoid anyone accidentally making their own team!
When students click the link, they will be taken to the front page of your campaign
Here, they can click on their teachers team as shown below:
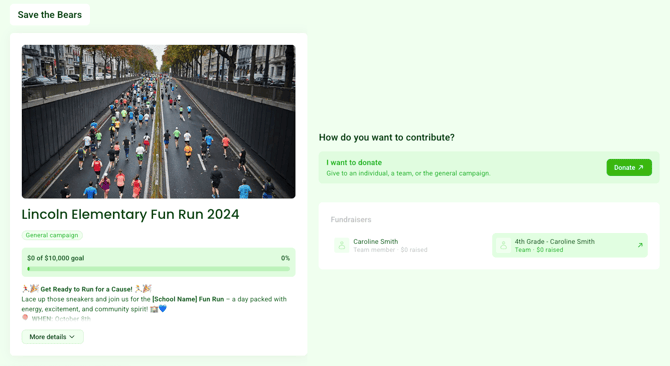
Method 2: From their team page
Each team will have their own team page which can be shared directly with their sponsors by clicking on the share link at the top of the page by clicking "Copy share link":
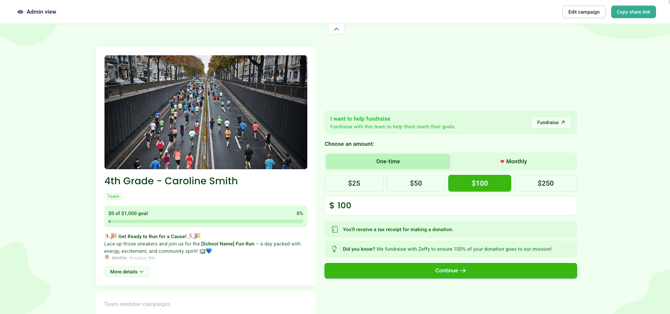
5. How to Share the Form
Your students, teachers and staff can now start sharing the form to start collecting donations!
Once your form configuration has been finalized and you're ready for it to be publicized, you'll be able to share it with your community. To learn how to share your form, consult the instructions here: Sharing your Zeffy form.
Remember to add ?noFundraise=True at the end of the URL/share link to avoid anyone accidentally making their own team!
Frequently Asked Questions
Q: Can I delete or edit a team or participant page from a peer-to-peer campaign?
A: Yes. As an organization administrator, you can edit or delete participant and team pages from your peer-to-peer campaign’s Overview tab. Participants can also edit their own page by logging in with the email address associated with it.
For full instructions, including what happens to donations when a page is deleted, see Delete or edit a team or participant page from a peer-to-peer campaign.
Q: Can I move a participant to a different team?
A: Yes. Our team can move a participant to another team or merge teams if needed. You can also use a workaround to create a new page under the correct team, move the donations to it, and delete the old page.
See Delete or edit a team or participant page from a peer-to-peer campaign for the available options and instructions.
Q: A donor accidentally donated to the general campaign, the wrong team, or the wrong participant. What can I do?
A: You can move the donation to the correct participant or team page from your dashboard:
Go to Fundraising → Payments.
Find and open the donation.
Click More in the payment details panel.
Select Move donation.
Choose the participant or team page where the donation should be counted.
For a full overview, including restrictions and recurring donations, see Move a donation to another form.
Q: We had a peer-to-peer campaign last year and would like to run it again this year. Can I duplicate the campaign?
A: Yes. You can clone your peer-to-peer campaign, then update the campaign details, goals, and dates for the new event. See How can I duplicate or clone my form?.