
How to switch from Mailchimp to Zeffy
You can move your nonprofit’s email communications from Mailchimp to Zeffy without rebuilding everything from scratch.
The easiest migration is to connect your Mailchimp account directly to Zeffy. Zeffy can import your contacts along with the lists and tags you already use for segmentation. You can then import the email designs you want to keep, configure your sender, and replace your Mailchimp newsletter signup form.
If you also want to use Zeffy as your nonprofit CRM, you can optionally import your historical donations and other supporter data afterward.
Before you start: decide how much you want to migrate
If your main goal is to start sending newsletters from Zeffy, you only need to migrate your:
Contacts
Lists and tags
Email designs you want to reuse
Newsletter signup form
If you also want to use Zeffy as your CRM, you can import historical donations and other supporter information later.
You don't need to migrate everything at once. We recommend starting with your contacts and email communications, then bringing over additional CRM data when you're ready.
Step 1: Import your Mailchimp contacts directly into Zeffy
If your contacts are already in Mailchimp, the easiest option is to connect Mailchimp directly to Zeffy rather than exporting and reformatting a spreadsheet.
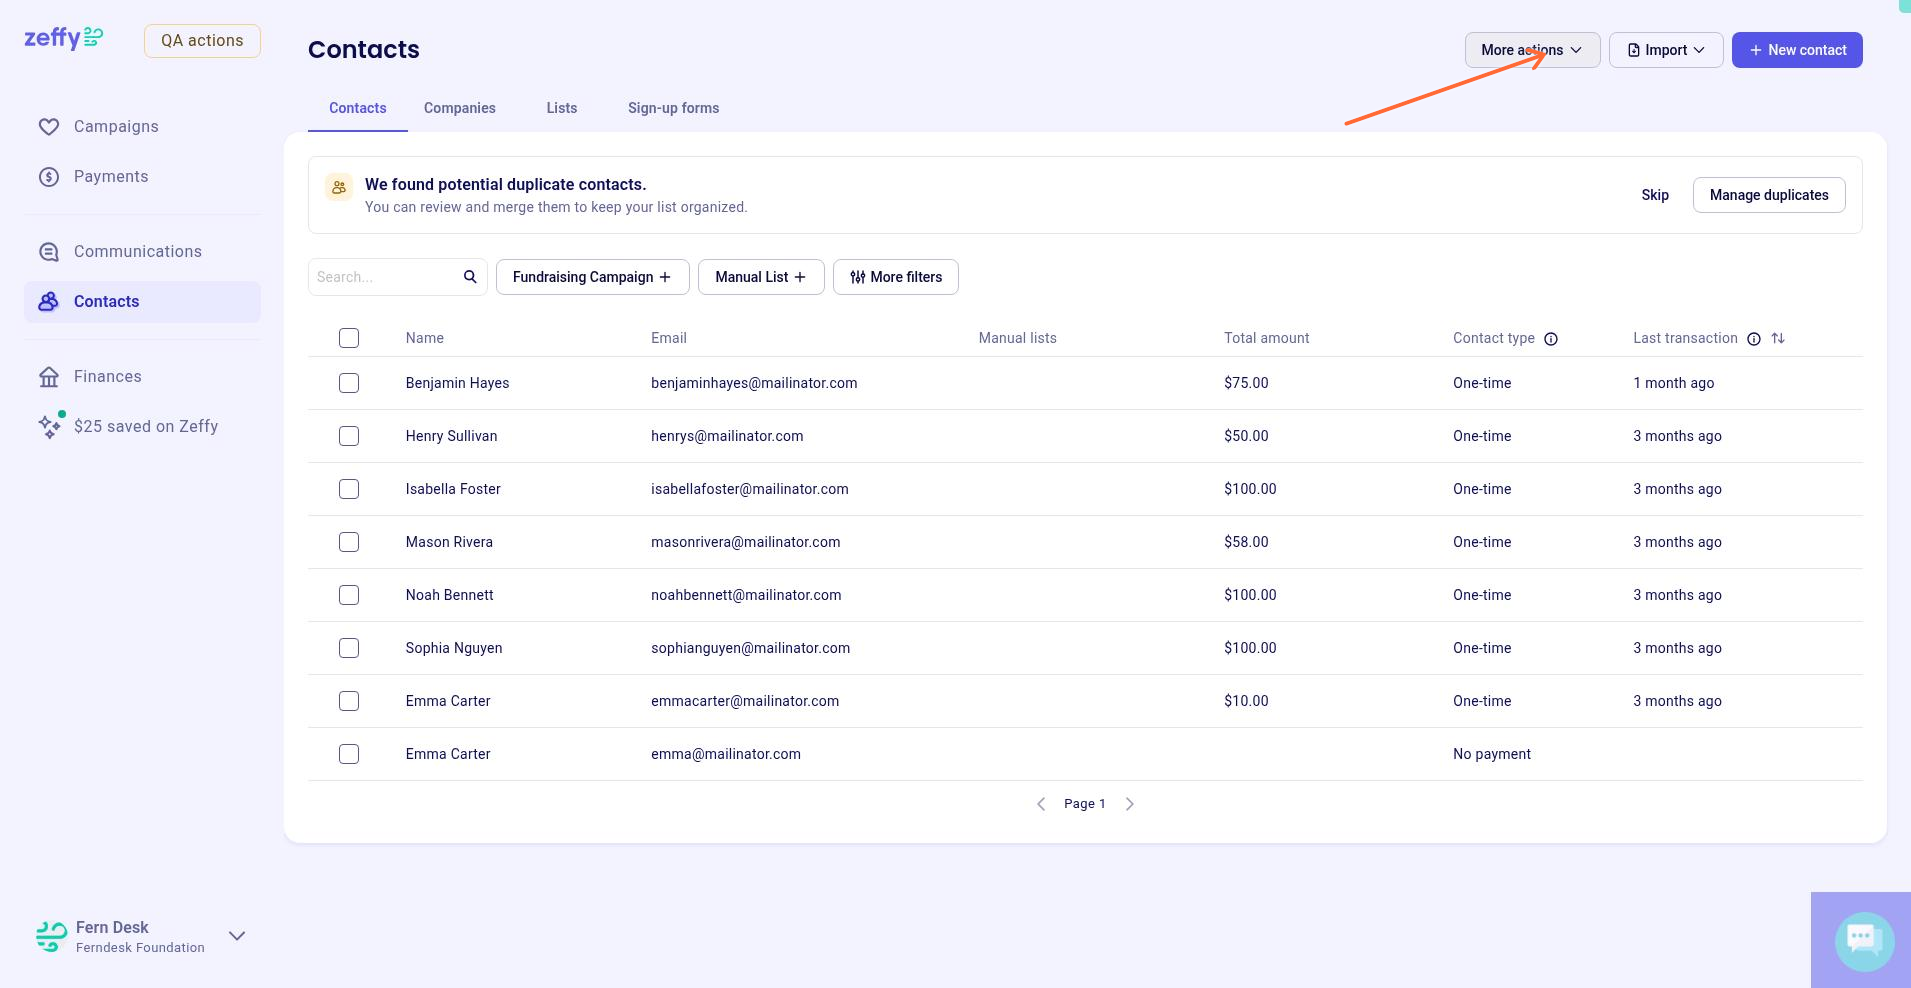
In your Zeffy dashboard, go to Contacts.
Click Add contact.
Select Import contacts.
Choose the Mailchimp import option.
Connect and authenticate your Mailchimp account.
Follow the prompts to import your contacts.
Zeffy imports your Mailchimp contacts and preserves the groups you use to organize them.
Mailchimp tags are converted into lists in Zeffy. This means that if you previously had a tag such as Major donors, Volunteers, or Newsletter subscribers, you'll find a corresponding list in Zeffy after the import.
Prefer to import a file instead?
You can also import contacts from a spreadsheet if you have contacts outside Mailchimp or prefer to work from a CSV file.
Go to Contacts.
Click Add contact.
Select Import contacts.
Choose Import a file, then upload your spreadsheet.
Wait for the import to finish processing.
Review the column-to-field mapping.
Click Continue, then Submit.
See Import contacts into Zeffy for the complete file-import workflow and template.
If you're moving specifically from Mailchimp, however, we recommend using the direct Mailchimp integration whenever possible.
The contact import limit is 10,000 records per file. If you have more, split your spreadsheet into multiple files.
Step 2: Review your imported lists and segmentation
Zeffy uses lists as its main way of grouping and segmenting contacts.
When you import from Mailchimp, your existing tags are converted into lists automatically, so you shouldn't need to recreate each group manually.
After the import:
Go to Contacts.
Review your imported lists.
Confirm that the groups you regularly email - such as donors, members, volunteers, or newsletter subscribers are available.
You can also create new lists using Zeffy's contact filters.
For example, you could create a list of:
Donors who gave this year
Supporters who donated last year but not this year
Donors above a certain lifetime giving amount
People who supported a particular campaign
To create one:
Go to Contacts.
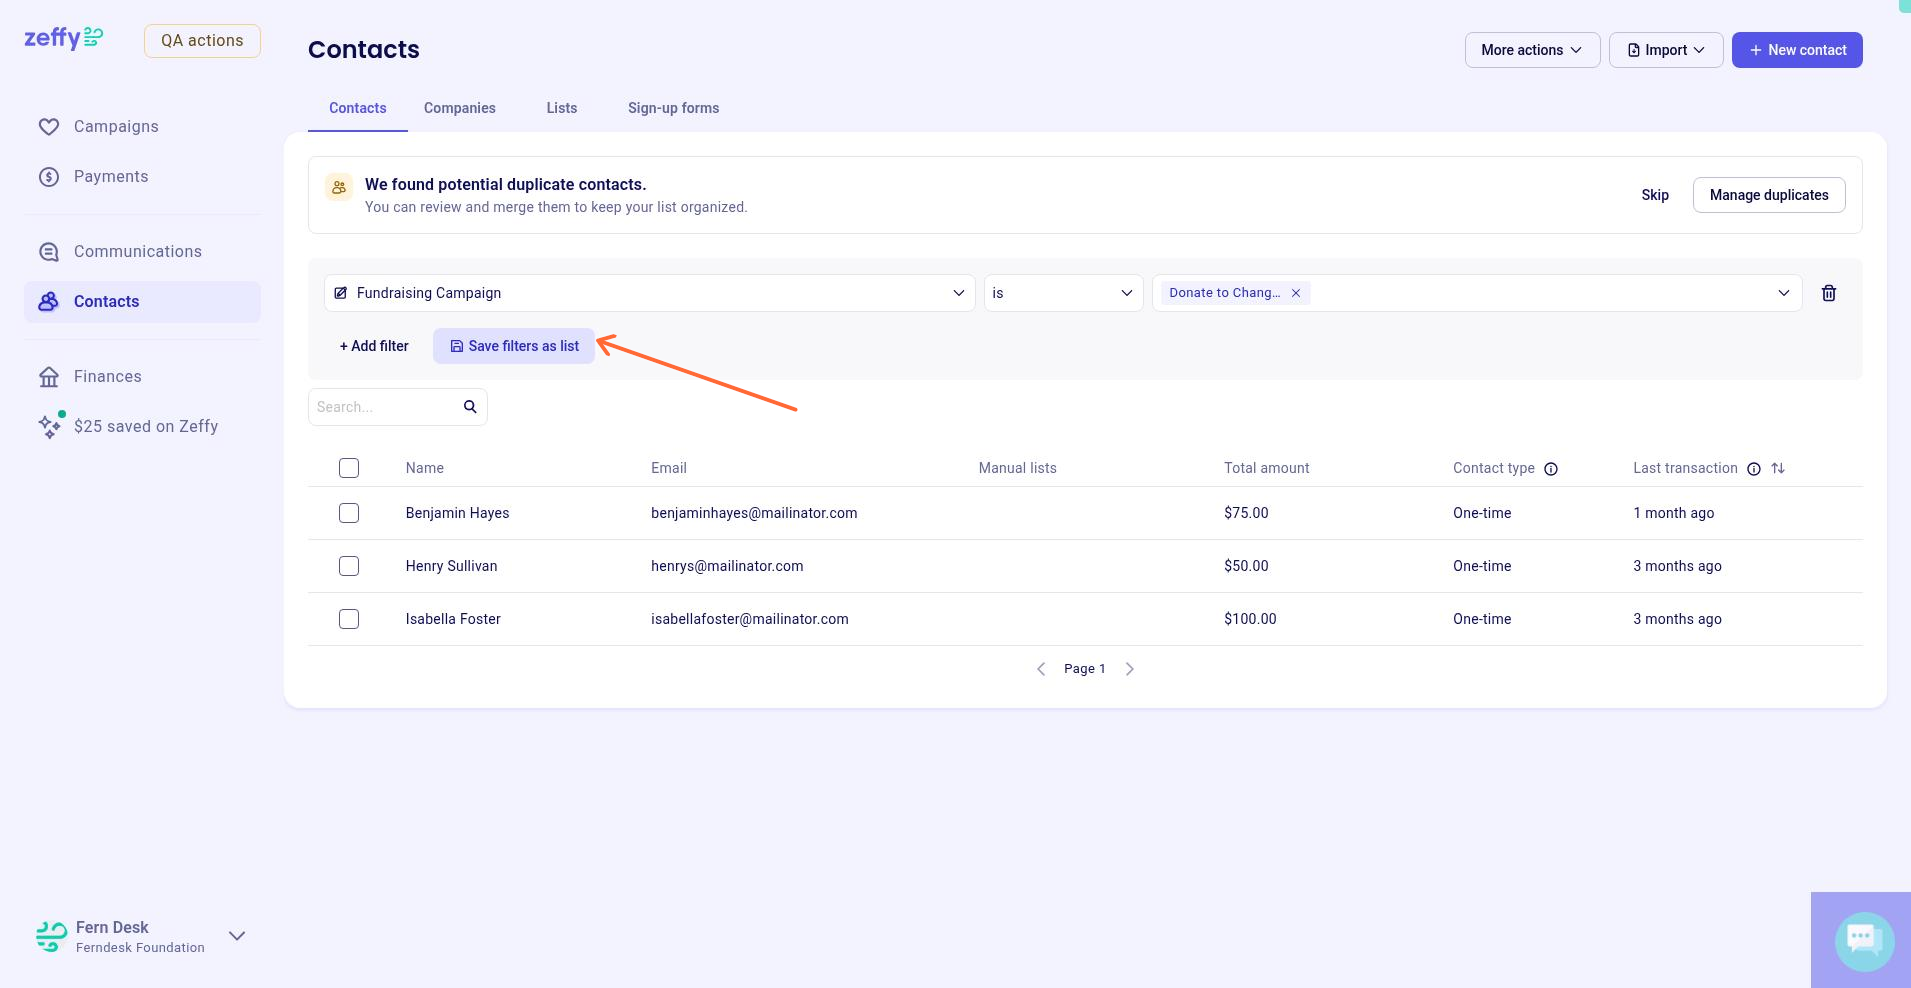
Click + Filter next to the search bar.
Select the criteria you want to use.
Click Save filters as list.
Choose whether the list should be automatic or manual.
An automatic list updates automatically whenever contacts start or stop meeting its criteria. A manual list stays fixed until you add or remove contacts yourself.
For more segmentation options, see Create lists and segments.
If you used a large number of Mailchimp tags
For more advanced segmentation, you can also create custom contact properties in Zeffy. These let you store information about your supporters and use it later as a filter.
For example, you could create properties for a supporter's program, chapter, school affiliation, volunteer role, interests, or another category specific to your organization.
Step 3: Import the Mailchimp email designs you want to keep
You don't necessarily need to recreate your Mailchimp newsletters from scratch.
Zeffy's email builder includes an HTML import option that lets you bring an existing Mailchimp design into Zeffy.
In Mailchimp, open the email design you want to migrate and retrieve its HTML code. Then:
In Zeffy, go to Communications.
Click New Email.
Choose the option to import an email design.
Paste the HTML from your Mailchimp email.
Import the design into Zeffy's email builder.
Review the imported email and make any adjustments you need.
You can then save the finished design as a Zeffy template and reuse it for future newsletters.
You don't need to import every Mailchimp email you've ever sent. We recommend starting with the designs you actively reuse - for example, your regular newsletter, fundraising appeal, or event update.
Zeffy does not currently import your complete history of previously sent Mailchimp newsletters. Import the designs you want to continue using instead.
You can also build a new design in Zeffy
If you want to start fresh, choose a Zeffy template or create an email from scratch using the block-based email builder.
You can add text, headings, images, buttons, dividers, fundraising campaigns, and other content. You can also upload your organization's images to your image library so they're easy to reuse.
See Designing emails with Zeffy's email builder and templates.
Step 4: Set up your email sender
Before sending your first newsletter, decide which email address you want supporters to see.
You can send using Zeffy's default sending domain or authenticate your organization's own domain.
For the best branding and deliverability, we recommend using a custom domain.
To set one up:
Go to Settings.
Select Add custom domain.
Follow the instructions to add the required records to your domain's DNS settings.
Wait for the domain to be authenticated.
Once your domain is authenticated, emails can be sent using your organization's domain rather than Zeffy's default sending domain.
By default, Zeffy sends bulk emails from [email protected]. You can customize the sender name and choose the reply-to address recipients will use when responding.
A custom domain also increases the maximum number of recipients for a single email from 5,000 to 30,000.
See Customizing your email sender domain.
You may also need to verify your account administrator's email address before you can edit, schedule, or send emails. See Validating or verifying your email address.
Step 5: Send your first newsletter from Zeffy
Once your contacts and design are ready, you can send your first email.
Open or create your email under Communications.
Finish editing the design.
Click Next and enter your subject line and sender information.
Continue to recipient selection.
Select the list or contacts you want to email.
Preview the recipients and make any exclusions you need.
Send yourself a test email if desired.
Review the email.
Click Send now or schedule it for later.
Zeffy automatically excludes contacts who have unsubscribed or are not opted in to communications.
You can also manually exclude individual contacts from a send without changing the underlying list.
See Sending emails and newsletters through Zeffy.
Step 6: Replace your Mailchimp newsletter signup form
If your website currently has a Mailchimp signup form, replace it with a Zeffy signup form before you stop using Mailchimp.
That way, new subscribers are added directly to your Zeffy contacts and lists.
Go to Contacts > Sign-up Forms.
Click Create Form.
Customize the form's title, colors, and fields.
Choose the Zeffy list new subscribers should be added to.
Open Share.
Choose Embed to add the form to your website or Stand-alone page to share it as a link.
You can add additional questions to the form if you'd like to collect more information from subscribers.
See Create a newsletter sign-up form.
Before removing your old Mailchimp form, test the Zeffy form yourself and confirm that the new contact appears in the correct list.
Step 7: Track your email results
After sending your newsletter, you can track its performance directly in Zeffy.
Go to Communications.
Open the Emails tab.
Select the email you sent.
You'll be able to review metrics including:
Opens
Clicks
Purchases
Unsubscribes
Bounced or failed emails
Zeffy also includes a click map showing which links recipients interacted with.
Because your emails and fundraising are in the same platform, Zeffy can also show when someone completes a transaction after clicking an email. This makes it easier to see how much fundraising activity a particular appeal or newsletter generated.
See Tracking email performance.
Optional: Import your historical donations
You don't need to import donation history just to switch your newsletters from Mailchimp to Zeffy.
However, if you want to use Zeffy as your broader nonprofit CRM, importing historical donations gives you more information to use when segmenting and communicating with supporters.
For example, you could later create lists of:
Donors who gave last year but haven't given this year
Major donors
First-time donors
Supporters of a specific fundraising campaign
Donors above a certain lifetime contribution amount
Payment imports are separate from contact imports.
To import historical donations:
Go to Payments > New Payment > Import.
Download and complete the payment import template.
Set the appropriate transaction type, such as donation.
Upload and submit the file.
Imported payments can then become part of each contact's fundraising history.
Active recurring payment schedules cannot be transferred automatically. If you have recurring donors outside Zeffy, they will need to start a new recurring donation through a Zeffy form.
See Importing historical payments into Zeffy and Importing recurring payments and donations.
Optional: Use more of Zeffy's CRM
Once your newsletter is running in Zeffy, you can bring more of your supporter management into the same platform.
For example, you can:
View a contact's fundraising history
Create dynamic donor segments
Add custom contact properties
Add notes to contact profiles
Create follow-up reminders
Associate contacts with households
Associate contacts with companies
Track supporter activity over time
You don't need to configure all of these features before switching from Mailchimp.
If your immediate goal is simply to stop paying for a separate newsletter platform, focus first on importing your contacts, confirming your lists, bringing over your main email designs, setting up your sender, and replacing your signup form.
See Getting started with Zeffy's CRM.
Mailchimp to Zeffy migration checklist
Before cancelling your Mailchimp subscription, confirm that you've:
Connected Mailchimp to Zeffy and imported your contacts
Reviewed the lists created from your Mailchimp lists and tags
Confirmed your key subscriber groups are available in Zeffy
Imported the Mailchimp email designs you want to keep
Saved frequently used designs as Zeffy templates
Configured your sender information
Authenticated your custom domain, if you're using one
Sent yourself a test email
Created a Zeffy newsletter signup form
Replaced the Mailchimp signup form on your website
Tested that new subscribers are added to the correct Zeffy list
Sent your first newsletter from Zeffy
If you're also moving your CRM, you can then import historical donations and configure any additional segmentation or contact properties you need.
Once you've tested the full flow - from a new subscriber joining your list to receiving an email - you can confidently retire your Mailchimp setup and manage your nonprofit's email communications directly in Zeffy.
Looking for a more visual tutorial? View our webinar on moving from mailchimp to Zeffy here :