
User Roles, Permissions, and Account Ownership Transfers
Add users to your account
Log into your Zeffy dashboard on a computer.
Click on your name in the bottom left corner and select "Settings".
Click on "Manage Users" under the Organization section.
The "Manage Users" option will not be visible if you don't have permissions to manage users. Contact your account owner to request access.
To add a new user:
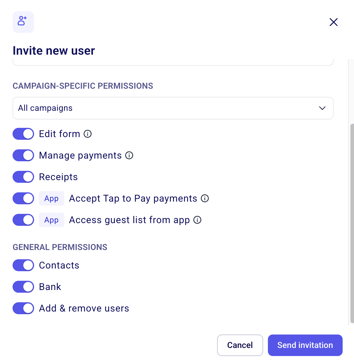
Click "Invite New User" and enter their email address and information.
Customize their access permissions by selecting which sections of the product they can access.
You can add as many users as you'd like.
Add your accountant
Click "Add my accountant" under the Bank information section. This preselects access to your bank permissions only.
Campaign-specific permissions
You can assign and manage a colleague's access to specific campaigns and forms:
Click the three dots next to the user's name and select "Edit user".
Under "Campaign-specific permissions," choose:
"All campaigns" — access to everything
"Only specific campaigns" — select exactly which campaigns they can edit
You can also update who has access to a specific campaign while editing that campaign directly, using the "Invite collaborators" section.
Zeffy does not currently support "view-only" access for individual campaigns or forms — users with access can both view and edit. If you'd like this feature added, vote for it here.
Transfer account ownership
You must be the current admin to transfer ownership.
Go to Settings → Manage users.
If the new owner isn't already a user, add them first using "Invite new user".
Click the three dots next to their name.
Select "Make admin" to transfer ownership.

Security note: For security reasons, ownership transfers require verification. If the admin of your account is not responsive or you've lost access to the admin email, contact support via the chat icon in your account. Our team can transfer ownership on your behalf after verifying your authority to manage the account.
Remove a user
Log in with a user account that has "add/remove users" permission.
Go to Settings → Manage users.
Click the three dots to the right of the user's name.
Select "Remove user".
Understanding permissions and access
Edit Form
Access to all forms and actions in the Campaigns tab: viewing, editing, creating, sharing, and deleting forms. Can be granted on a per-campaign basis.
Manage Payments
Access to the Payments tab: view all payments, export the payments list, add manual payments, issue refunds, and cancel tickets. Can be granted on a per-campaign basis.
Receipts
Access to view all tax receipts issued through the platform, export receipt reports, and cancel issued receipts. Can be granted on a per-campaign basis.
Accept Tap to Pay Payments
Allows the user to sign into the Tap to Pay app on their mobile device and accept payments directly from any compatible form. Does not provide access to your organization's Zeffy dashboard or administrative settings. Can be granted on a per-campaign basis.
Access Guest List from App
Allows the user to sign into the Tap to Pay app and check guests in using the lightning check-in manager. When they scan an e-ticket QR code with the app scanner, the ticket is checked in automatically and ticket details open—they do not need to follow a browser link. Can be granted on a per-campaign basis. For day-of steps, see Checking-in guests the day of your event.
Contacts
Access to the Contacts and Communications tabs: view all contacts, import and export contacts, create contact lists, edit contact information, and create and manage communications.
Bank
Access to edit banking information, view payout information, edit the payout schedule, and export payout reports. The user will receive email notifications about payouts. They can also view the Transactions tab and export information about all online payments.
Add/remove users
Allows the user to add other users to the Zeffy account, manage their permissions, and remove users.
Only the account admin can transfer ownership and delete the Zeffy account.