
How to create, send, and collect invoices
Invoices make it easy to bill donors, sponsors, members, or other contacts and collect their payments online.
An invoice is not an actual payment. Instead, it's a payment request you create for a specific amount. Nothing is sent to the buyer when you create it; you must copy the invoice link and send it yourself.
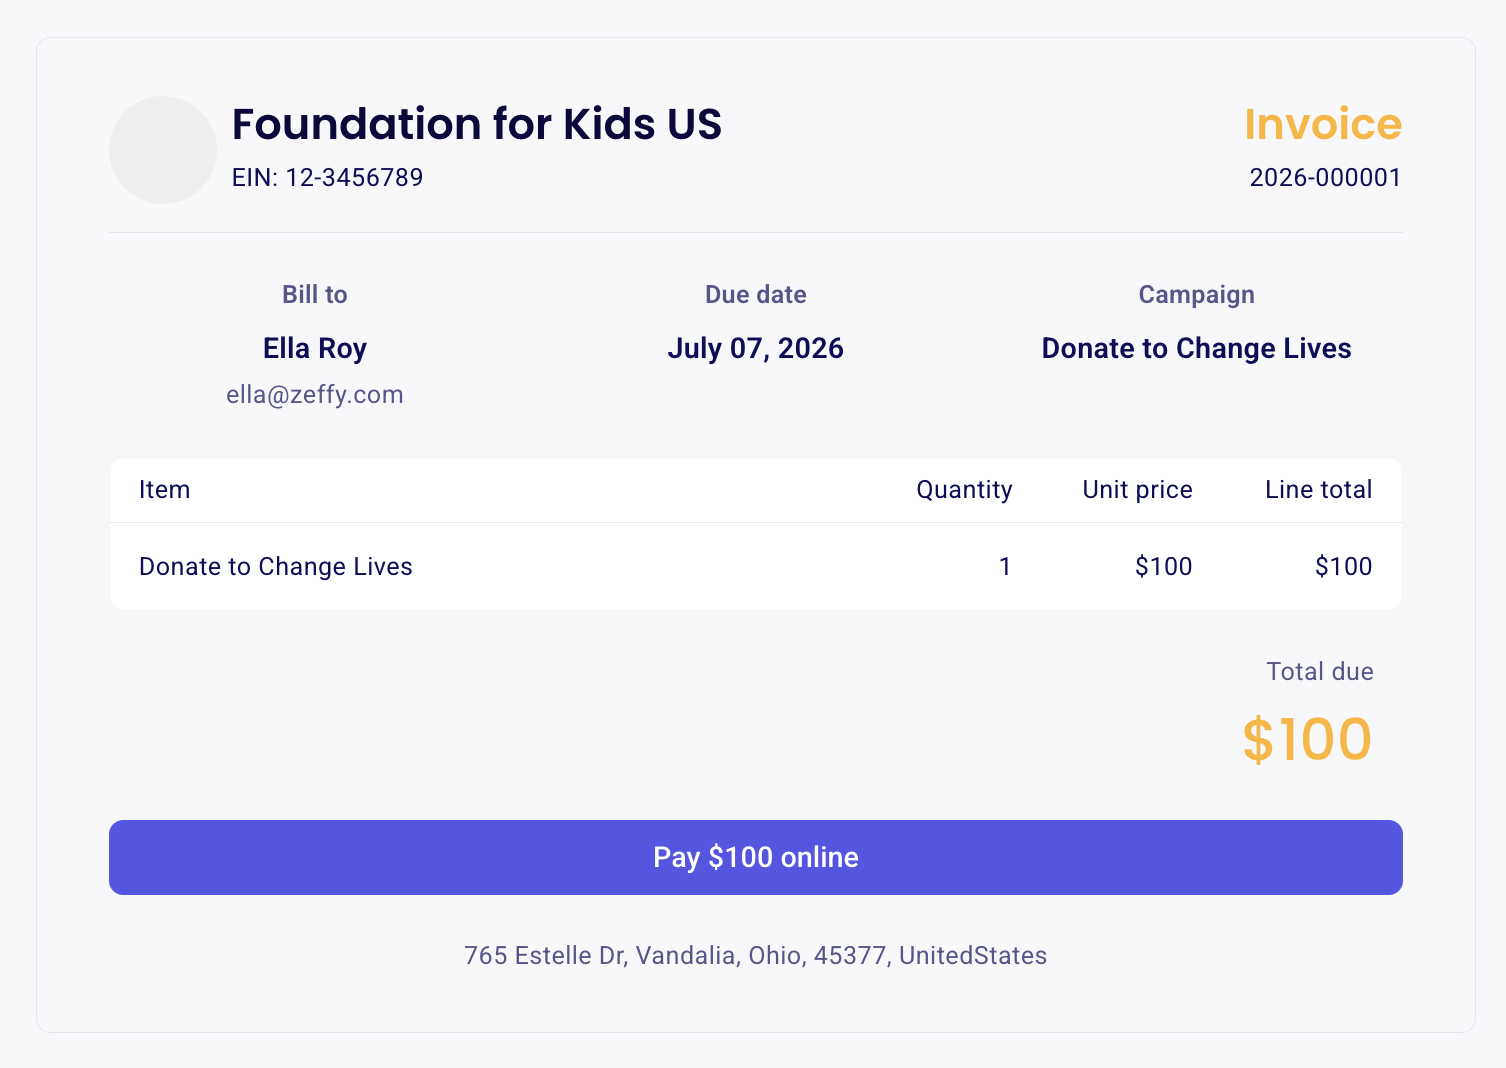
When you create an invoice, Zeffy generates a dedicated invoice page that the contact can use to pay online by card, Apple Pay, Google Pay, or ACH. Invoices are associated with a donation campaign and are included in fundraising totals just like completed payments.
How invoices work
Once an invoice is created, it appears in Payments with a status of Due.
The invoiced amount is immediately included in your campaign totals, even before the invoice is paid.
The invoice page includes your organization name, an invoice number, the item details, and the total amount due. You can also set a due date and enable automated reminders.
Zeffy does not automatically email the invoice to the buyer when you create it. To share the invoice, you need to copy the invoice link and send it to the contact directly. The contact can then open the link to view and pay the invoice online.
If automated reminders are enabled, the contact will receive reminder emails:
7 days before the due date / On the due date / 7 days after the due date
These reminders are only sent if a due date is set and reminders are enabled. They do not replace the initial step of sharing the invoice link with the contact.
Alternatively, you can mark the invoice as paid if you receive the payment offline, such as by cash, check, or another payment method.
Create an invoice
In your Zeffy dashboard, go to Payments.
Click Add payment in the top-right corner and select Send an invoice.
Choose the Campaign the invoice is associated with.
Enter the Amount.
Set a Due date.
(Optional) Check Automated reminder to the contact if you would like the contact to receive reminder emails. When enabled, the first reminder is sent 7 days before the due date, and two more are sent after that if the invoice remains unpaid.
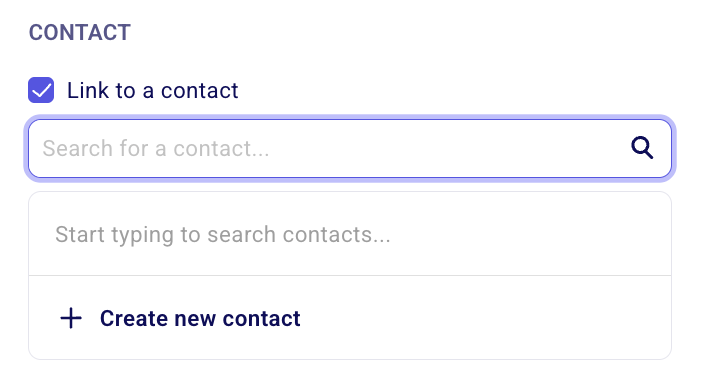
Associate the invoice with a contact. You can either:
Search for and select an existing contact already in your account.
Or create a new contact manually if one does not yet exist. If creating a new contact, you will be asked to enter the contact’s name and email address.
Customize the remaining invoice details. Depending on your needs, you can:
Add internal notes.
Complete any custom questions associated with the campaign.
Click Save or Save & add another.
The invoice is not sent automatically. Zeffy does not email the invoice to the buyer when you create it. You must open the invoice details, click View invoice, copy the URL, and send it to the contact yourself.
Where invoices appear
After saving, the invoice appears in the Payments list as a new row with:
Status: Due - the contact has not yet paid.
Payment method: Invoice.
This indicates the payment has been requested but has not yet been received.
Collect an invoice / Mark it as paid
There are two ways to have an invoice paid by the individual you are invoicing.
Send the contact the invoice link and collect the donation online.
Manually mark the invoice as paid if the payment was received outside of Zeffy.
Option 1: Send the invoice link
Head to Payments and click on the invoice.
Be careful not to click on the contact’s name, as that will take you to their contact profile. Instead, click anywhere else on the invoice row to open the invoice details in the panel on the right-hand side.
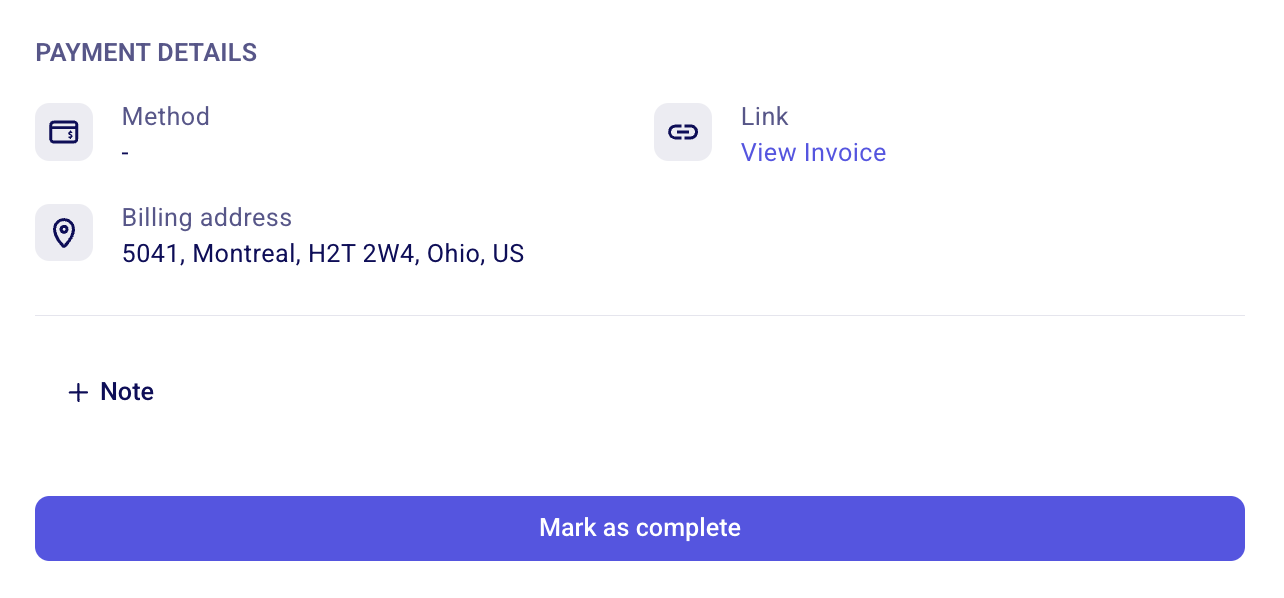
On the invoice details page, click View invoice to open the invoice page.

Copy the URL from the invoice page and send it to the contact.
When the contact completes the payment, the invoice will be converted into a completed payment with:
Status: Succeeded
Payment method: Card, Apple/Google Pay, or ACH (depending on the payment method used)
Important: An invoice will only be automatically completed if the contact uses the invoice link associated with that invoice.
If the contact pays through a different donation form or event link, Zeffy will create a separate payment and the invoice will remain in Due status. If this happens, simply cancel the original invoice to remove the outstanding balance. Instructions for cancelling an invoice can be found further below in this guide.
If the invoice link is shared with someone after the invoice has already been marked as paid, the page will show that the payment has already been completed.
Option 2: Manually mark an invoice as paid offline
Head to Payments and click on the invoice.
Be careful not to click on the contact’s name, as that will take you to their contact profile. Instead, click anywhere else on the invoice row to open the invoice details in the panel on the right-hand side.
Click Mark as complete.
Select the payment method: Cash, Check, or Other.
(Optional) Update the payment date if needed.
Click Confirm.
The invoice will be converted into a completed payment with:
Status: Succeeded
Payment method: Cash, Check, or Other
A note on completed invoices
Once an invoice is marked as paid, it becomes a regular transaction in Zeffy. The actions available will depend on how the invoice was completed.
If the invoice was paid online, the payment behaves like any other online transaction. You can issue a refund, cancel tickets, generate tax receipts (if eligible), resend thank-you emails, move the donation to another campaign, and use any other standard payment actions available in Zeffy.
If the invoice was marked as paid manually, the payment behaves like any other manual payment entry. You can still generate tax receipts (if eligible), resend thank-you emails, move the donation, and perform other standard actions. However, because no actual payment was processed through Zeffy, the transaction cannot be refunded. Instead, manually recorded payments can be deleted if they were entered in error.
Cancel or delete an invoice
You can remove an invoice at any point before or after it is marked as paid.
Cancel an unpaid invoice
Head to Payments and click on the invoice.
Be careful not to click on the contact’s name, as that will take you to their contact profile. Instead, click anywhere else on the invoice row to open the invoice details in the panel on the right-hand side.
Click Actions, then Cancel invoice.
Confirm in the Cancel invoice modal. This removes the invoice from the associated campaign and deletes the record.
Delete a completed invoice
Once an invoice has been marked as paid, the available actions depend on how the payment was completed:
If the invoice was paid online, the payment behaves like any other online donation in Zeffy. You can refund the payment by opening it in Payments, clicking Actions, and selecting Refund. More information on how to refund a payment can be found here: Managing Refunds in Zeffy
If the invoice was marked as paid manually, the payment becomes a manual payment entry which can be deleted the same way you would delete any other manual payment. For this:
Head to Payments and click on the payment.
Be careful not to click on the contact’s name, as that will take you to their contact profile. Instead, click anywhere else on the invoice row to open the invoice details in the panel on the right-hand side.
Click Actions > Delete.
Notes on invoice records
Once an invoice is marked as paid, there is no remaining record that it was originally an invoice. If you need to track that history, add a note to the transaction before completing it. See How can I add a note to a transaction?
For more on recording offline payments, see Manual payment or registration entries to log cash, check or other offline payments. For deleting manual entries, see Delete a manually entered payment.