
How to add Your Zeffy Campaign to a WordPress Website
Adding your Zeffy campaign to your WordPress website makes it easy for visitors to donate, register for events, purchase memberships, buy tickets, and support your organization directly from your website.
There are three ways to add a Zeffy campaign to a WordPress website:
Use the Zeffy WordPress plugin (Recommended)
Add a button that links to your campaign
Embed the campaign directly on your page
Option 1: Use the Zeffy WordPress Plugin (Recommended)
Retrieve your Zeffy campaign link
Log in to your Zeffy account.
Navigate to Campaigns and find the campaign you want to share.
Click the three dots (⋯) to the right of the campaign.
Select Share.
In the sharing pop-up, click Copy link. The campaign URL is now copied to your clipboard
Install the Zeffy plugin on WordPress
In WordPress, go to Plugins → Add New
Search for “Zeffy”
Click «Installand Activate»
Plugin listing: https://wordpress.org/plugins/zeffy-donate-button/
Connect the plugin to your Zeffy campaign URL
In WordPress, go to Settings → Zeffy
Paste your full Zeffy campaign URL into the Campaign URL field
Example format:https://www.zeffy.com/en-US/donation-form/your-campaign-idClick Save Changes
Important: The shortcodes below will use this saved Campaign URL by default.
Add Your Campaign to a Page
Option A: Embed the Full Campaign
Open the page or post where you'd like your campaign to appear and add one of the following shortcodes.
Use: [zeffy-donate]
This displays your campaign directly on the page as an embedded form.
Option B: Add a Donate Button
Use:[zeffy-donate-button]
This displays a button that opens your campaign in a pop-up when clicked.
(Optional) Customize the Embedded Campaign
The [zeffy-donate] shortcode supports the following settings:
Width and Height
Default: 700 × 1000
Example:
[zeffy-donate width=800 height=1200]
Full Width
Default: false
Example:
[zeffy-donate fullwidth=true]
Alignment
Options: left, center, right
Default: center
Example:
[zeffy-donate align=left]
Campaign URL Override
Use a different campaign URL on a specific page.
Example:
[zeffy-donate url="https://www.zeffy.com/en-US/donation-form/xyz789"]
(Optional) Customize the Donate Button
The [zeffy-donate-button] shortcode supports the following settings:
Button Text
Default: Donate Now
Example:
[zeffy-donate-button text="Support Us"]
Button Background Color
Default: #007bff
Example:[zeffy-donate-button bg-color="#28a745"]
Button Text Color
Default: #ffffff
Example:
[zeffy-donate-button text-color="#000000"]
Campaign URL Override
Use a different campaign URL for a specific button.
Example:
[zeffy-donate-button url="https://www.zeffy.com/en-US/donation-form/xyz789"]
Publish and test
Publish or update your page in wordpress
Option 2: Add a button
Buttons are a great way to drive visitors to your campaign while maintaining the look and feel of your website.
Retrieve your campaign link
Log in to your Zeffy account.
Navigate to Campaigns.
Find the campaign you would like to share.
Click the three dots (⋯) to the right of the campaign.
Select Share.
In the sharing pop-up, click Copy link. The campaign URL is now copied to your clipboard.

Create a button on your Wordpress website
Log in to your WordPress dashboard.
Open the page or post where you'd like to add the button.
Click the + Block Inserter.
Search for and select Buttons.
Click Add button if prompted.
You can also follow these detailed Wordpress instructions for adding a button to your website: https://wordpress.com/support/wordpress-editor/blocks/buttons-block/
Add your Zeffy campaign link to the button
Enter the text you'd like displayed on the button (for example, "Donate Now" or "Register Today").
Click the Link icon in the button toolbar.
Paste the Zeffy campaign link copied in Step 1.
Press Enter to apply the link.
Save or publish your page.
Save / Publish your changes
Option 3: Embed your campaign
Embedding allows supporters to interact with your campaign directly on your website without leaving the page.
Retrieve your campaign embed code from Zeffy
Log in to your Zeffy account.
Navigate to Campaigns.
Find the campaign you would like to share.
Click the three dots (⋯) to the right of the campaign.
Select Share.
In the sharing pop-up, click More ways to share and then select the Embed option.
Under Embeds, choose the Campaign option.
Copy the generated HTML embed code. You'll use this code in the next steps to add your campaign to your website.
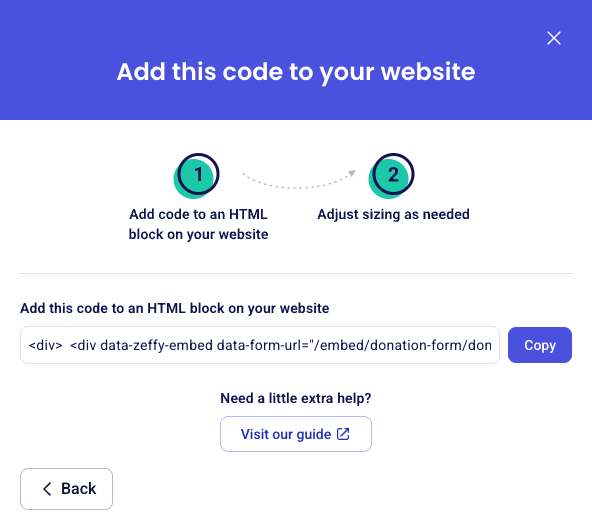
Add a Custom HTML block to your WordPress page
Open the page or post where you'd like to embed your campaign.
Click the + Block Inserter.
Search for and select Custom HTML.
You can also follow the Wordpress tutorial for adding an HTML block to your website: https://wordpress.com/support/wordpress-editor/blocks/custom-html-block/
Add your Zeffy embed code
Paste the HTML code copied from Zeffy into the Custom HTML block.
Use the Preview option to confirm the campaign displays correctly.
Save or publish your page.
Your Zeffy campaign should now appear directly on your Wordpress website.
Why does my embedded campaign look different from the full Zeffy page?
Embedded Zeffy campaigns use a simplified layout designed to fit seamlessly within your website and allow supporters to complete their donation, registration, or payment without leaving your page.
As a result, embedded forms do not display your campaign description, images, logo, or nonprofit name. Instead, they focus only on the information needed to complete the transaction.
If you'd like visitors to see additional campaign details, we recommend adding that content directly to your website above or beside the embedded form. Alternatively, you can add a button that links directly to your Zeffy campaign page, which displays the full campaign experience, including all images and descriptions.