
How to add your Zeffy campaign to a Wix website
Adding your Zeffy campaign to your Wix website makes it easy for visitors to donate, register for events, purchase memberships, buy tickets, or support your organization directly from your website.
There are three ways to add a Zeffy campaign to a Wix website:
Add a button that links to your campaign
Embed the campaign directly on your page
Use the Zeffy Wix app to add a donate button
Option 1: Add a button
Buttons are a great way to drive visitors to your campaign while maintaining the look and feel of your website.
Retrieve your campaign link
Log in to your Zeffy account.
Navigate to Campaigns.
Find the campaign you would like to share.
Click the three dots (⋯) to the right of the campaign.
Select Share.
In the sharing pop-up, click Copy link. The campaign URL is now copied to your clipboard.

Create a button on your Wix website
Open your website in the Wix Editor.
Click the Add Elements (+) button on the left side of the editor.
Select Button.
Choose the button style you'd like to add.
Drag the button onto your page.
You can also follow Wix's detailed instructions for adding a button to your website: https://support.wix.com/en/article/wix-harmony-editor-adding-and-customizing-buttons
Add your Zeffy campaign link to the button
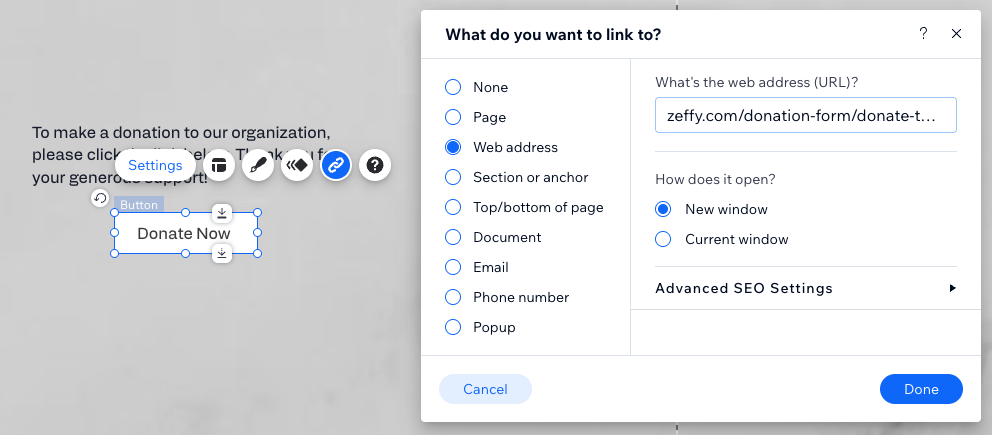
Click the button.
Click the Link icon.
Under Choose a Link, select Web Address.
Paste the Zeffy campaign link copied in Step 1.
Click Done.
Save / Publish your changes
Option 2: Embed your campaign
Embedding allows supporters to interact with your campaign directly on your website without leaving the page.
Retrieve your campaign embed code from Zeffy
Log in to your Zeffy account.
Navigate to Campaigns.
Find the campaign you would like to share.
Click the three dots (⋯) to the right of the campaign.
Select Share.
In the sharing pop-up, click More ways to share and then select the Embed option.
Under Embeds, choose the Campaign option.
Copy the generated HTML embed code. You'll use this code in the next steps to add your campaign to your website.
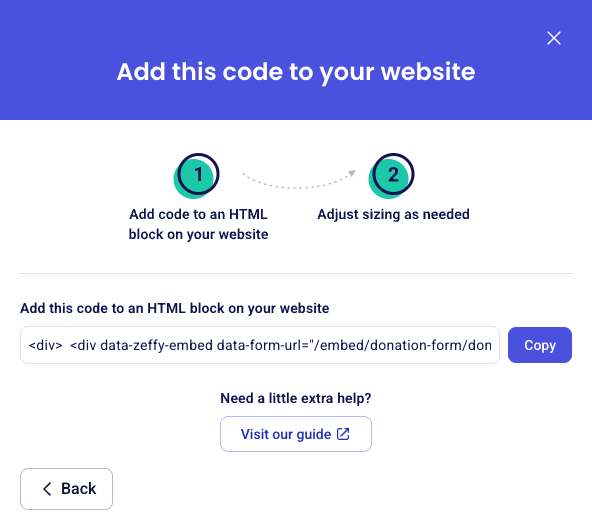
Add an HTML embed element to your Wix website
Open your website in the Wix Editor.
Click Add Elements (+).
Select Embed Code.
Click Embed HTML.
Drag the HTML embed element onto your page.
You can also follow Wix's detailed instructions for adding an HTML block to your website:
https://support.wix.com/en/article/wix-editor-embedding-custom-code-on-your-site
Add your Zeffy embed code
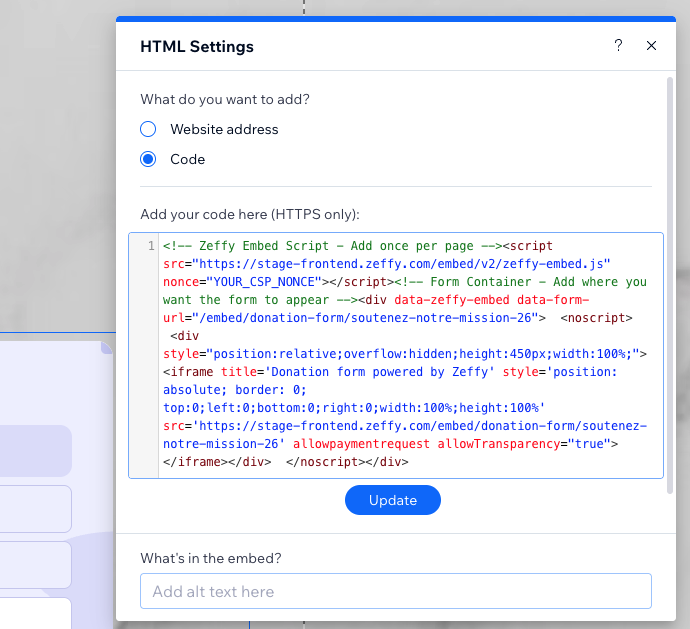
Click the HTML embed element.
Click Enter Code and paste the embed code copied from Zeffy.
Click Update.
Resize the embedded element as needed.
Publish your website.
Why does my embedded campaign look different from the full Zeffy page?
Embedded Zeffy campaigns use a simplified layout designed to fit seamlessly within your website and allow supporters to complete their donation, registration, or payment without leaving your page.
As a result, embedded forms do not display your campaign description, images, logo, or nonprofit name. Instead, they focus only on the information needed to complete the transaction.
If you'd like visitors to see additional campaign details, we recommend adding that content directly to your website above or beside the embedded form. Alternatively, you can add a button that links directly to your Zeffy campaign page, which displays the full campaign experience, including all images and descriptions.
Option 3: Use the Zeffy Wix app
Install the Zeffy app
In your Wix site, open the App Market (the apps section of the editor) and search for Zeffy. Select Zeffy donations and fundraising and add it to your site.
Once installed, the Zeffy widget appears on your page - usually a bit lower down. You'll move and style it in the next steps.
Copy your Zeffy campaign link
Log in to your Zeffy account and navigate to Campaigns.
Find the campaign you would like to share.
Click the three dots (⋯) to the right of the campaign.
Select Share.
In the sharing pop-up, click Copy link.
Connect your campaign URL
Back in the Wix editor, click your Zeffy widget and open Settings. Paste your campaign link into the redirect URL field – the field that sets where the button sends people.
Choose how the form opens
In the same settings panel, decide what happens when someone clicks your button:
New tab – your campaign opens in a separate browser tab
Pop-up – your campaign opens in a window over your site, so donors never leave your page
After choosing, save your changes. Both options work equally well - pick the experience you want to give your supporters.
Customize your button
Adjust the button to match your branding: change the label (e.g. "Donate"), the background color, and the text color. Take a moment to make it feel like part of your site.
Place and size your button
Drag the button to where it makes the most sense - a common spot is the navigation bar, so visitors can donate as soon as they land.
Then click Switch to mobile to check how it looks on phones, and reposition it if needed (for example, inside your mobile menu).
Publish and test
Click Preview to review your page, then Publish.
Depending on your template, the button may not work correctly in Preview mode - this is normal. Once your site is published, the button works as expected. Always test on your live, published site: click your button and confirm your Zeffy campaign opens (in a new tab or pop-up, depending on your choice).