
Complete Your UK Stripe Verification
This guide walks you through how to configure and verify your organization's banking and business information on Zeffy. Completing these steps is required in order to receive payouts and stay compliant with Stripe's verification requirements.
To get started, log in to your Zeffy account and navigate to the Finances tab in the left-hand menu. There, click Get Started to begin your verification.
Step 1: Enter your organization's legal information
Provide your organization's official information. You'll be asked for:
Organization name
Website
Brief description of your mission and fundraising activities
CRN — Companies House Registration Number (if applicable)
HMRC number (if applicable)
If your organization does not have an HMRC or CRN number, please select Other Charity or Organization instead. The HMRC and CRN fields will not be required for that organization type.
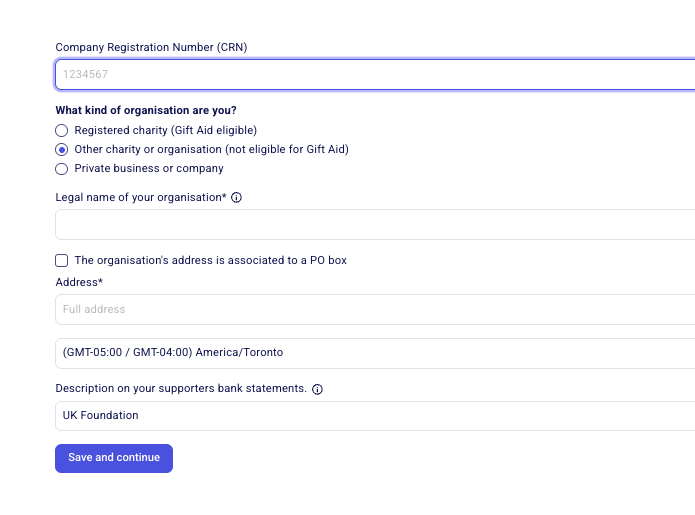
Step 2: Complete the "Tell us about your business" section
The information you entered in the previous Organization Information section will automatically be carried over to this page. However, we strongly recommend reviewing each field carefully before continuing to ensure all information is accurate and up to date.
You may be asked to confirm or provide:
Legal business name
Trading name (if applicable)
Companies House Registration Number (CRN)
Business address
Business phone number
Organization website
Product description
Product description: In the product description, briefly describe how your organization will use Stripe and Zeffy, such as collecting donations, selling event tickets, processing memberships, or accepting program registrations.
Important: If you mention raffles, lotteries, prize draws, or similar gaming activities, Stripe may request additional documentation, including proof of the appropriate license.
Step 3: Upload a supporting document
Stripe requires a document that verifies your nonprofit or charitable organization's registration and legal status.
Select the document type that best matches your organization and upload a clear copy of the document. Accepted documents include:
VAT Registration
Certificate of Incorporation
Companies House Document
HM Revenue and Customs: VAT Certificate
HM Revenue and Customs: Account Statement
Charity Commission Document
OSCR Scottish Charity Regulator
Ofsted School Inspection Report
The information on the document must match the legal information provided in the previous step, including your organization's legal name and address. Any discrepancies between the document and the information submitted may cause the verification process to fail or require additional review.
If none of the listed document types apply to your organization, select Other and upload an official document showing your organization's legal name and address.
Examples include a governing document or constitution, trust deed, articles of association, government-issued registration or tax document, bank statement, utility bill, or another official document establishing your organization's existence.
The name and address on the document must match the information entered during verification.
Step 4: Upload a supporting document
Here, Stripe will ask for information about your organization's legal representative. This is an individual authorized to act on behalf of the organization.
On this page, Stripe will ask for this person's:
Full legal name
Email address
Job title
Date of birth
Home address
Phone number
Important: The person whose details are entered here will later be asked to complete an identity verification check. This includes uploading a government-issued ID and completing a live selfie verification. To avoid delays, ensure the information entered on this page matches the ID that will be used later in the verification process.
Once entered, click on Continue.
Step 5: Provide the Legal Representative's Information
The individual selected as your organization's legal representative will now be asked to complete Stripe's identity verification process.
This verification consists of two parts:
Uploading a government-issued photo ID (such as a driver's license, passport, or provincial/state ID)
Completing a live selfie verification to confirm that the person uploading the ID is the same person shown on the document
Tips for a Successful Verification
Accepted IDs
UK driver's licence
Passport (UK or international)
UK national identity card (where applicable)
Requirements and tips
To avoid delays or rejected submissions:
Use a valid, unexpired ID
Ensure the name and date of birth on the ID match exactly what was entered in the previous step
Make sure the ID is not damaged, altered, or obscured
Use a mobile device if possible, as mobile cameras generally produce higher-quality images than webcams
Take photos in a well-lit area and avoid glare, shadows, or blurry images
Place the ID on a plain, dark background
Ensure the entire ID is visible in the photo
Remove sunglasses, hats, masks, or anything else that may obstruct your face during selfie verification
Confirm that your browser or device has permission to access your camera
If your ID or selfie isn't being accepted, see ID Verification: Requirements, Setup, and Troubleshooting for photo quality tips, selfie guidance, and browser recommendations.
Step 6: Add or Confirm Directors / Trustees
Stripe requires information about your organization's directors or trustees. These are typically the individuals who sit on the organization's governing board.
If your organization can be found in public records, Stripe may automatically retrieve some or all of these individuals. In that case, you'll see them listed on this page and will simply need to confirm that the information is correct.
If no directors or trustees are found in public records, this page may appear blank. In that case, you'll need to add them manually.
To edit or remove an existing director/trustee, click Edit next to their name.
To add a new director/trustee, click Add Director.
If the person who completed identity verification in the previous step is also a director or trustee, click Add Director and select them from the dropdown menu.
If you need to add a different individual, click Add Director → Add somebody new, then enter their information.
When adding a new director or trustee, Stripe will ask for their legal name, email address, job title or role within the organization, date of birth, and home address. This information must be provided for each director and/or trustee associated with your organization.
Why am I being asked for dates of birth and home addresses?
These requirements come directly from Stripe and cannot be bypassed by Zeffy. As a regulated financial services provider, Stripe is required to comply with Know Your Customer (KYC) and anti-money laundering regulations, including requirements that apply across the UK and Europe. As part of these regulations, Stripe must collect and verify information about the individuals who control or govern organizations that accept payments.
The information collected is used solely for verification and regulatory compliance purposes. However, providing it is mandatory in order to continue accepting payments through Stripe and Zeffy.
If you have questions about these requirements, particularly why Stripe requires dates of birth and home addresses for directors and trustees, you can learn more in Stripe's documentation here.
Once all directors and/or trustees have been added and confirmed, click Continue.
Step 7: Verify Your Directors / Trustees
As a final step, Stripe will ask you to verify the list of directors and/or trustees associated with your organization.
This step will only be required if:
You added or modified directors/trustees compared to the information Stripe retrieved from public records, or
Stripe was unable to find director/trustee information in public records and you entered it manually.
If this step is required, Stripe provides two verification methods:
Uploading a document that lists your organization's directors or trustees
Completing an electronic attestation
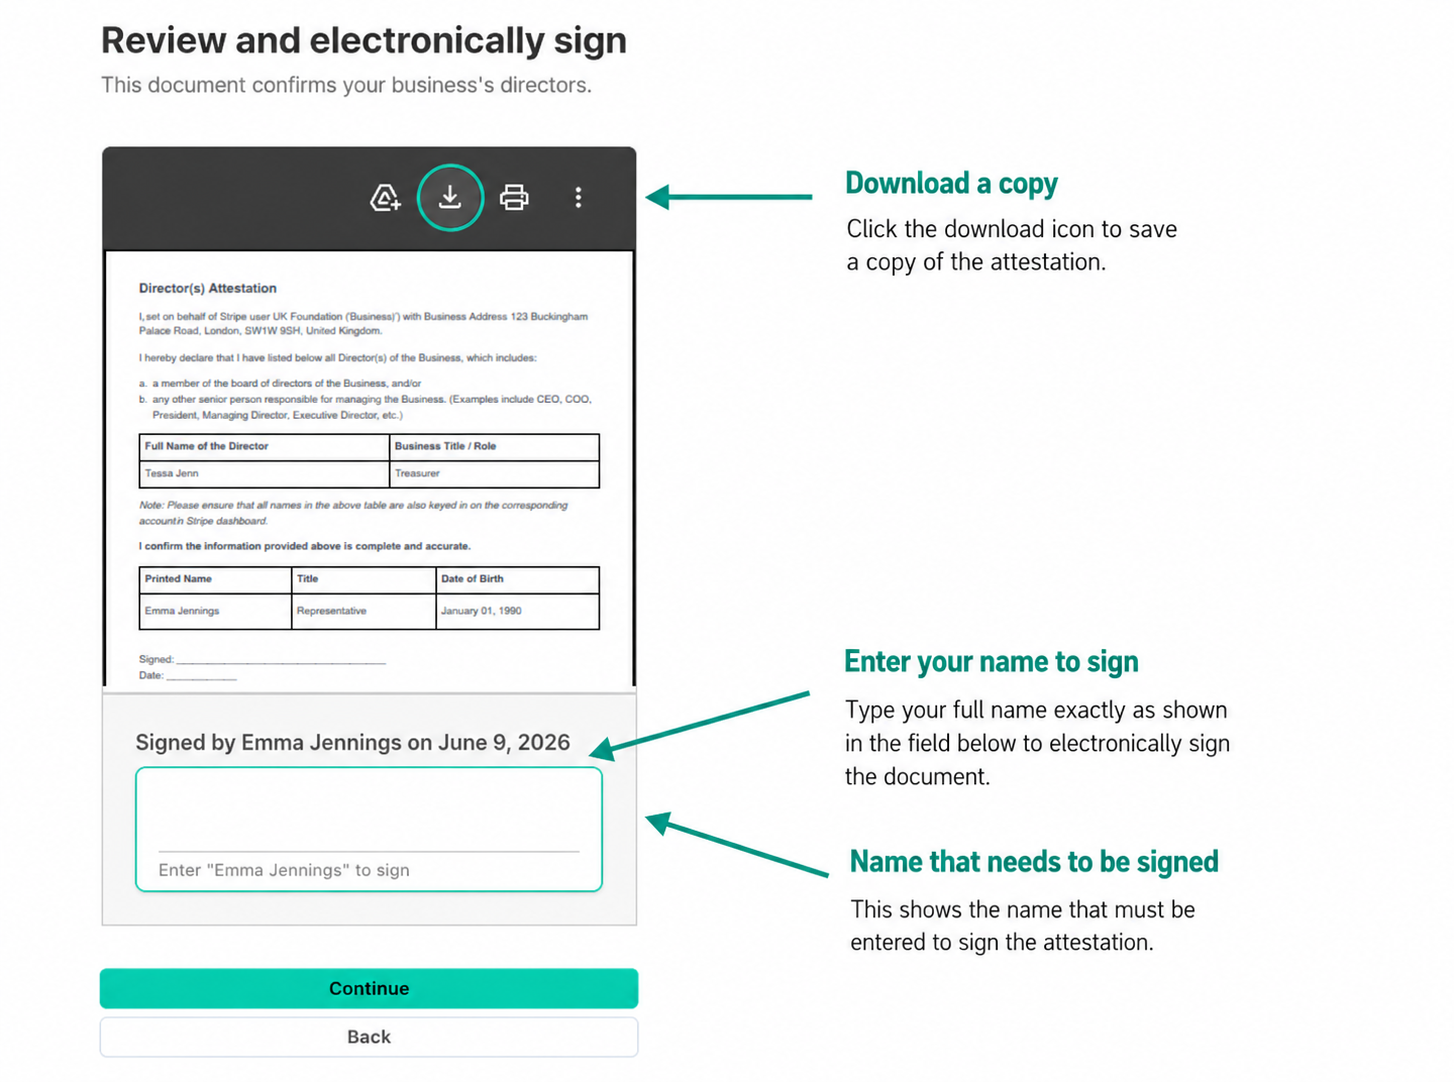
Option 1: Electronic Attestation (Recommended)
We strongly recommend selecting Electronic Attestation.
With this option, the legal representative who completed identity verification will review a Stripe-generated agreement confirming that the directors and/or trustees listed are accurate, then sign it electronically by typing their name.
Stripe will display the agreement before it is signed, and you can download a copy for your records.
Once signed, click on Continue.
Option 2: Upload a Supporting Document
Alternatively, you can upload a document that verifies your organization's directors and/or trustees. The document must show:
Your organization's legal name
Your organization's address
The directors' and/or trustees' names exactly as entered in Stripe
If the information on the document does not match what was entered during verification, Stripe may reject the submission and request additional documentation.
If you choose to upload a document, please note that verification can take up to 24 hours to be completed. Until Stripe has finished reviewing the document, we won't be able to confirm whether the verification was successful. If any additional information or documentation is required, Stripe will contact you directly within that review period.
Step 8: Review and submit
Once you have provided your directors' information and completed any required verification steps, the final step is to review your submission and confirm that all information is accurate.
Carefully review the details provided throughout the verification process, then click Agree and Submit to send your information to Stripe for review.
By submitting, you agree to Stripe's terms and conditions and consent to Zeffy and Stripe processing information required to verify your organization and facilitate future payment processing.
Step 9: Add your Bank Account
After submitting to Stripe, you'll be asked to enter your organization's banking information. Personal bank accounts are not accepted. You'll need:
Account number
Sort code
Important: The bank account must belong to the organization. Personal bank accounts are not accepted. The account holder name should closely match the legal organization name.