
Creating segments and lists
Use lists and filters to organize contacts into reusable audiences in Zeffy.
For a quick visual walkthrough of lists, watch this video.
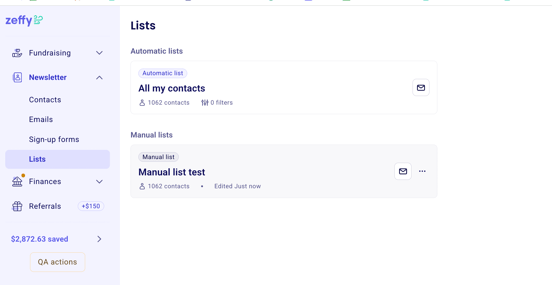
You can apply filters from the Contacts tab, save those filters as lists, and manage saved lists from the Lists tab.
The existing tags feature transitions into lists. Tagged contacts are converted into manual lists so the same grouping stays available.
Understand automatic and manual lists
Zeffy supports two list types.
Automatic lists
Automatic lists are dynamic and update automatically based on the filters you set.
Use an automatic list when the audience should stay current without manual updates.
Automatic lists work well for:
Sending newsletters to donors of specific campaigns
Managing active campaign communications
Targeting contacts based on engagement or activity
Creating self-updating groups based on contact attributes
When you save a filter set as an automatic list, all contacts who already match the rules are added right away. The list keeps updating as contacts start or stop matching those rules.
Manual lists
Manual lists are static groups of specific contacts.
Use a manual list when you need a fixed audience that should not change automatically.
Manual lists work well for:
Board member contact lists
Volunteer rosters
Parent or guardian directories
Alumni databases
Imported mailing lists
Any fixed group that does not need automatic updates
When you save a filter set as a manual list, you create a snapshot of the contacts who match at that moment. The list does not update unless you change it yourself.

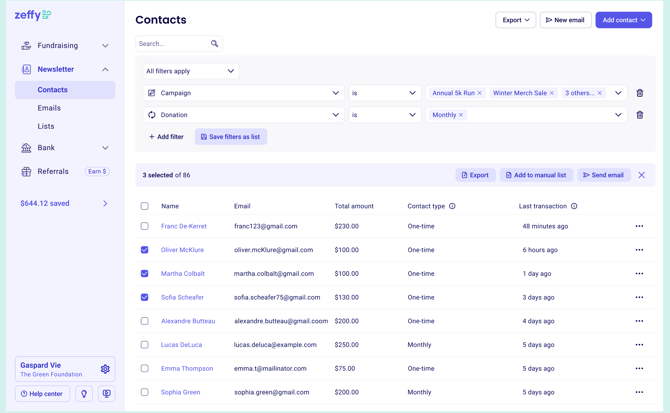
Filter contacts
Go to Contacts.
Click + Filter next to the search bar.
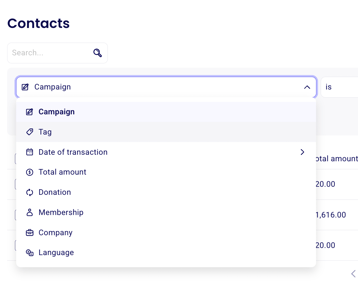
Select the filter type you want to use.
Choose the condition and apply the filter.
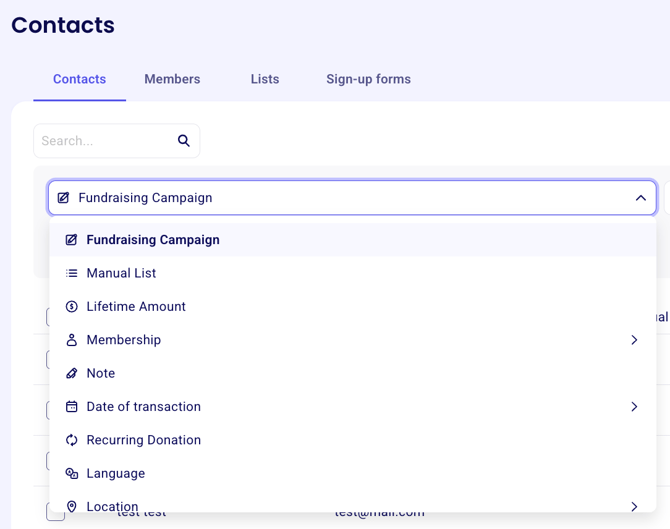
Use available filter types
You can build lists from many filter types, including:
Fundraising Campaign to filter contacts by a campaign they completed
Manual List to filter contacts by a list they were added to
Lifetime Amount to filter by total donated amount
Membership to filter by membership type, status, or related details
Note to filter by notes on a contact profile
Date of Transaction to filter by the date of a first, last, or any transaction
Recurring Donation to filter by recurring status or frequency
Language to filter by contact language
Location to filter by state, province, address, or country
Company to filter by company name
First Name, Last Name, and Email to filter by contact details
Set filter conditions
Each filter type has its own conditions.

Common examples include:
Fundraising Campaign: Is or Is not
Lifetime Amount: Is more than, Is less than, Is between, Is, or Is not
Date of Transaction: Is after, Is on, Is before, or Is between
Recurring Donation: Is, Is cancelled, Is past due, or Is not
Note: Contains, Does not contain, Is known, or Is unknown
Location: search by state, province, full address, or country
Company: search by company name to find associated contacts
Apply multiple filters
You can stack filters to build a more specific audience.
Apply your first filter.
Click + Filter again to add another.
Choose whether All filters apply or At least one filter applies.
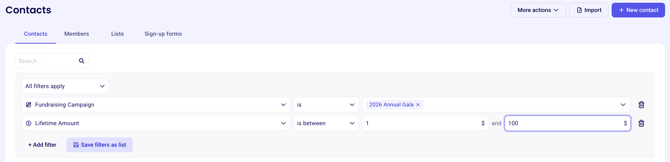
All filters apply shows only contacts who meet every condition. At least one filter applies shows contacts who meet any of the selected conditions.
To remove a filter, click the trash icon next to it. You can also change filter conditions at any time.
Save filters as a list
Once your filters are set, click Save filters as list.
Then choose whether to save the results as an automatic list or a manual list.
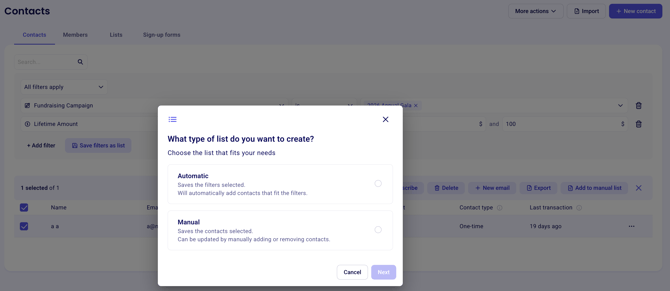
Choose Save as a dynamic list if contacts should be added automatically whenever they meet the filter conditions. Choose Save as a manual list if you want a fixed snapshot of the contacts who match right now.
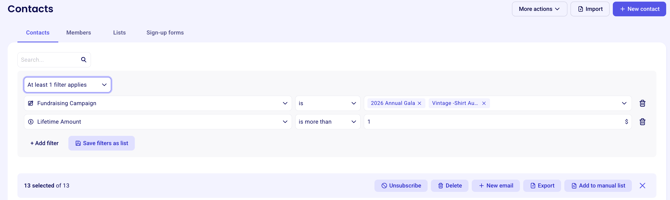
Take action on filtered results
After applying filters, you can work with the matching contacts right away.
Click Select All. Selected contacts are highlighted.
Choose the action you want to take.
From there, you can:
Export the contact list
Send an email to selected contacts
Delete selected contacts
Unsubscribe selected contacts from emails
Add selected contacts to a manual list
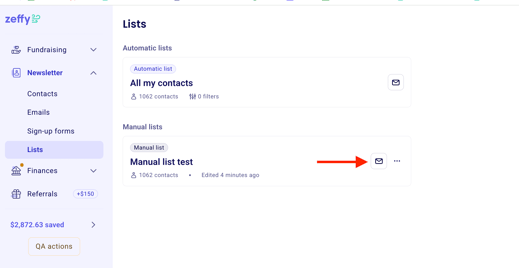
Send an email to a saved list
To send an email to a saved list of contacts, follow these steps.
Go to Contacts > Lists.
Find the list you want to use.
Click the mail icon next to the list to open the email builder.
All contacts in the list are added as recipients automatically.
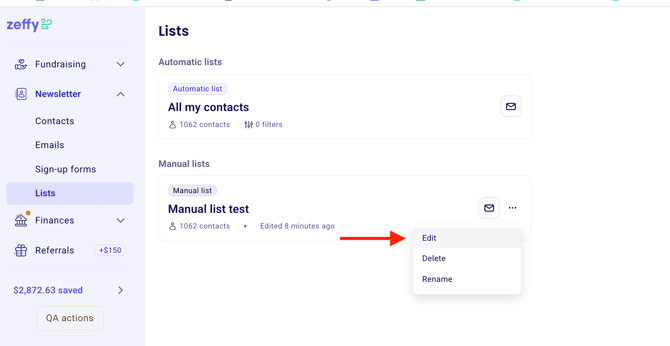
Edit, rename, or delete a list
You can manage existing lists from the Lists tab.
Go to Contacts > Lists.
Click the three dots next to the list.
Choose to edit, rename, or delete it.
What to do next
To grow your audience, see Create a newsletter sign-up form. To email a saved audience, see Send emails to contacts.