
Setting Up a Donation Campaign
Step 1: Campaign Title
Title your campaign
The campaign title informs the form URL (e.g. zeffy.com/donation/your-form-name). The form URL will be set when the form is saved for the first time and cannot be edited after.
Step 2: Fundraising Goal (Optional)
The progress bar will update to show your donors how close you are to achieving your fundraising goal.
Your goal can be adjusted at any time
Step 3: Campaign Description & Appearance
Add a description to share more about your mission. Zeffy provides a standard template you can customize.
Step 4-6: Campaign Appearance
Step 4: Choose a color scheme that matches your brand — pick between light mode or dark mode, with or without shapes.
Step 5: Upload a banner image — choose from Zeffy's image library or upload your own. You can also upload a YouTube video by selecting "Video" and pasting in the link.
Step 6: Upload your logo.
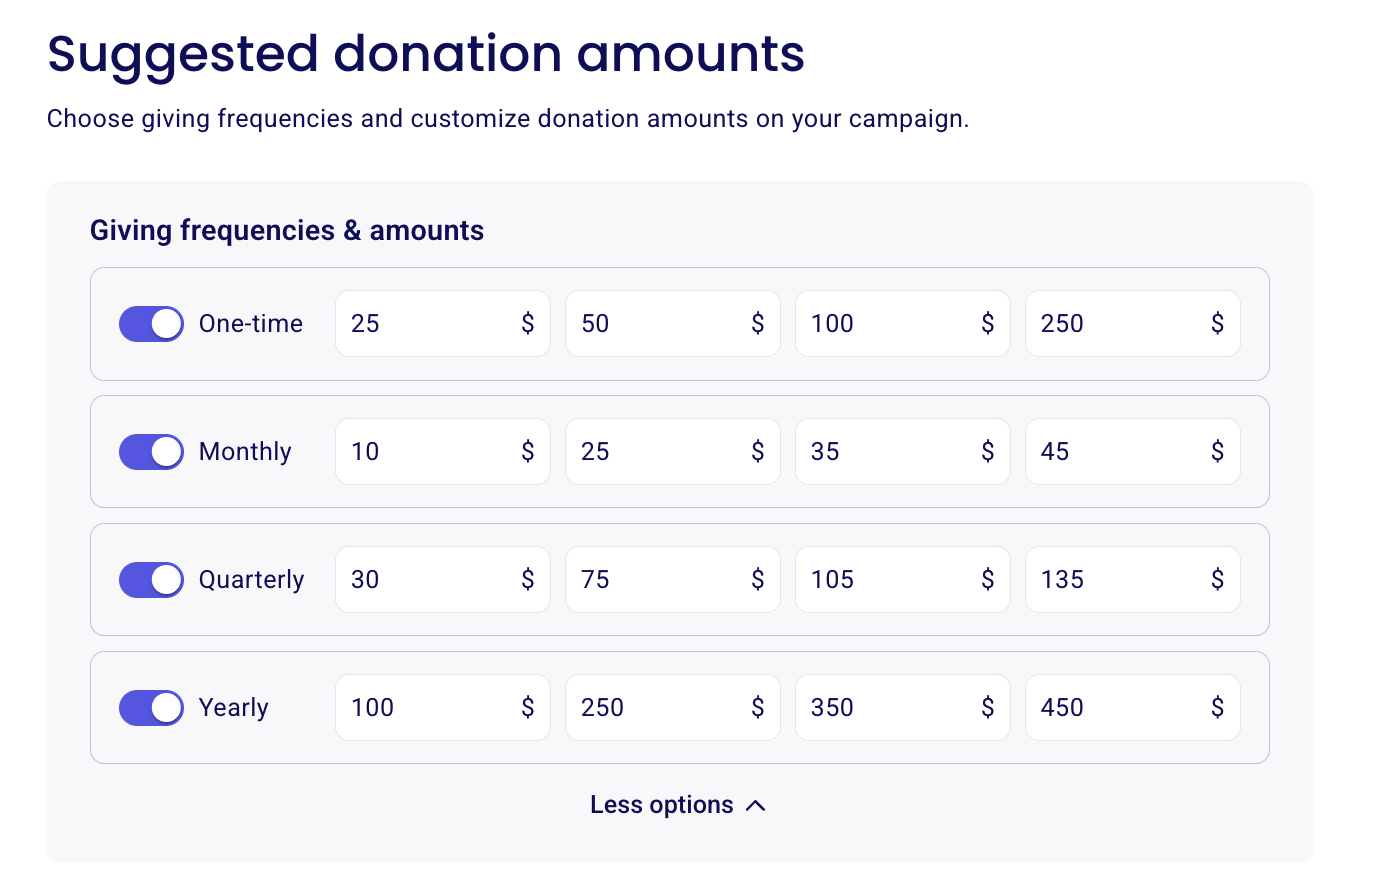
Step 7: Donation Amounts & Frequencies
Donation frequencies
You can activate any combination of the following:
One time
Monthly
Quarterly
Yearly
Suggested donation amounts
For each active frequency, you can set suggested donation amounts. These are suggestions only — donors will always have an open text field to enter any amount they choose.
Impact descriptions (optional)
For each suggested amount, you can add a brief description explaining what that donation amount helps you achieve. Donors only see this description when they click on a suggested amount. This option can be toggled on or off.

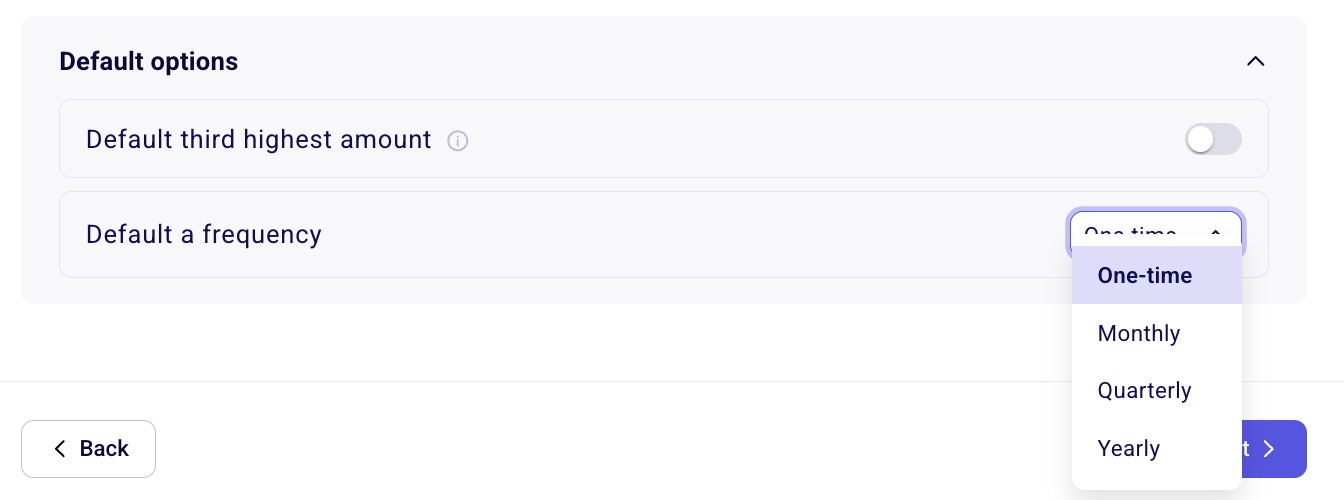
Default settings
Default amount: You can pre-fill the third highest suggested amount on the form.
Default frequency: You can set a specific frequency to be pre-selected when the form loads. Only frequencies you've activated will be available as a default.
Step 8: Tax Receipts
If your organization is eligible, you can enable automatic tax receipts. Zeffy's tax receipts are IRS and CRA compliant.
🇬🇧If your organization is based in the UK and is eligible for Gift Aid, Gift Aid can be enabled on your Zeffy account. Donors will then have the option to add Gift Aid to their donation at the payment step. Click here to learn how to connect your SwiftAid account.
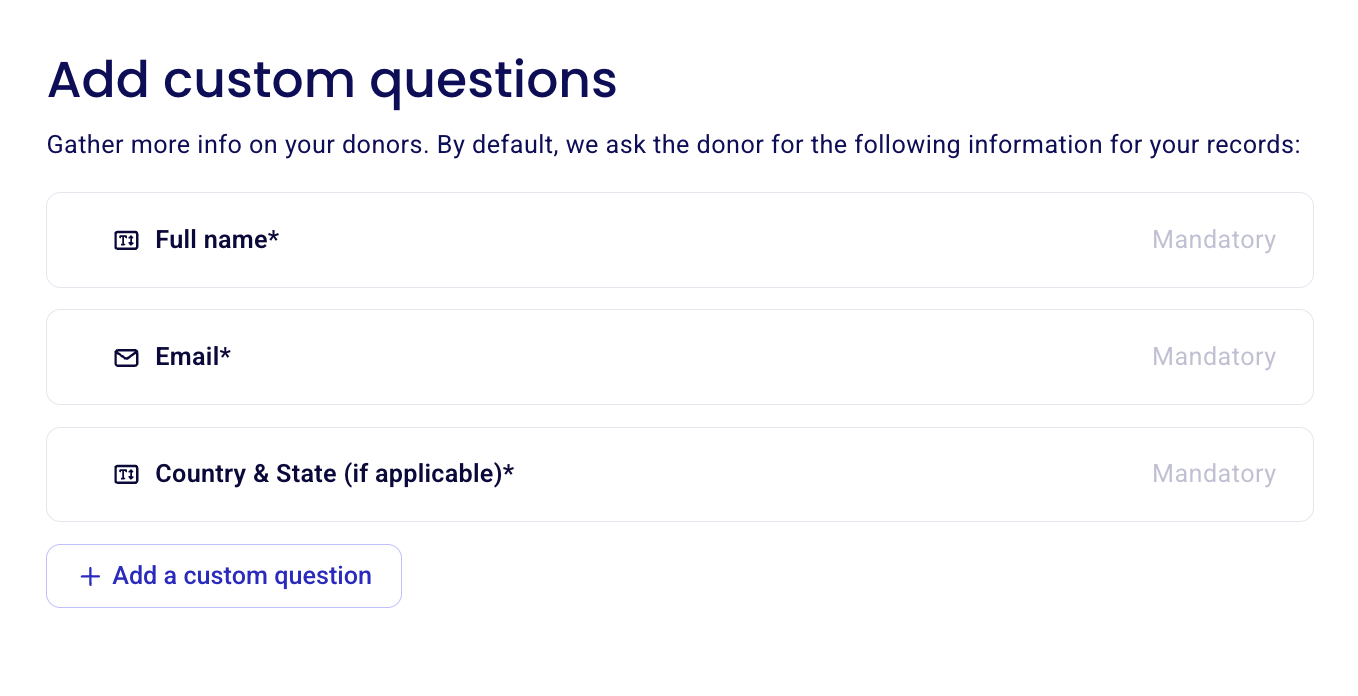
Step 9: Custom Questions
Add custom questions to collect additional information from your donors. Any information collected here will map directly to the donor's contact page in Zeffy.
By default, the donor's full name, email, state and country will be collected.
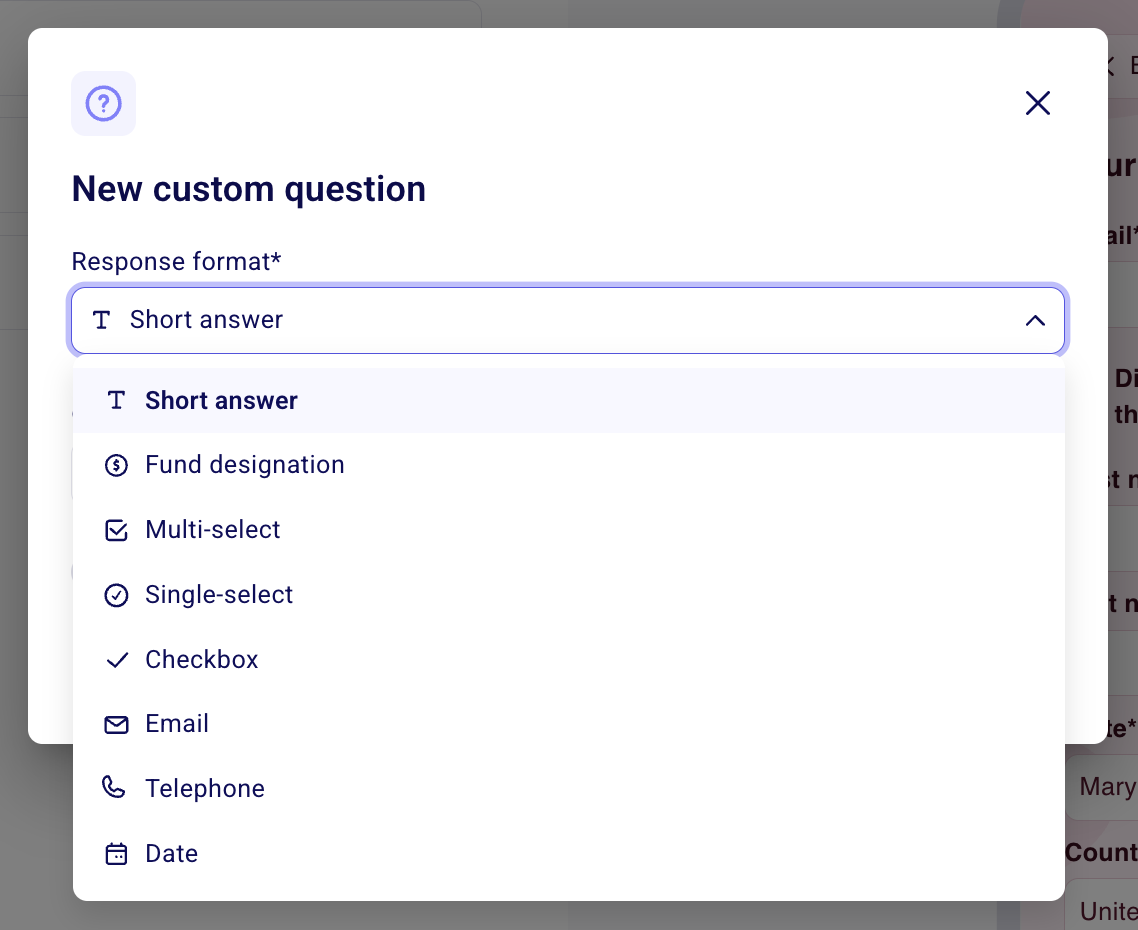
To add a question, click "Add a custom question." You can:
Make questions required or optional
Collect phone numbers, newsletter opt-ins, or other information
Use a variety of question formats: short answer, multi-select, or single-select (multiple choice)
Fund Designation
You can allow donors to designate their donation to a specific fund or set the fund you want donations to this campaign to be organized under.
You can customize the funds available for selection per campaign.
See Setting Up Funds and Fund Designation for full details on how to set this up.
Step 10: Thank You Email
Customize the thank you email your donors receive after completing their donation. This email is automatically sent alongside:
Their tax receipt (if enabled)
Their transaction receipt, which includes a full breakdown of their donation amount, payment method, and any optional contribution to Zeffy
To redirect donors to a custom thank-you webpage instead of the default Zeffy page after they complete their donation, see How to Redirect Donors to a Custom Thank You Page. This is set up by request through our support team.
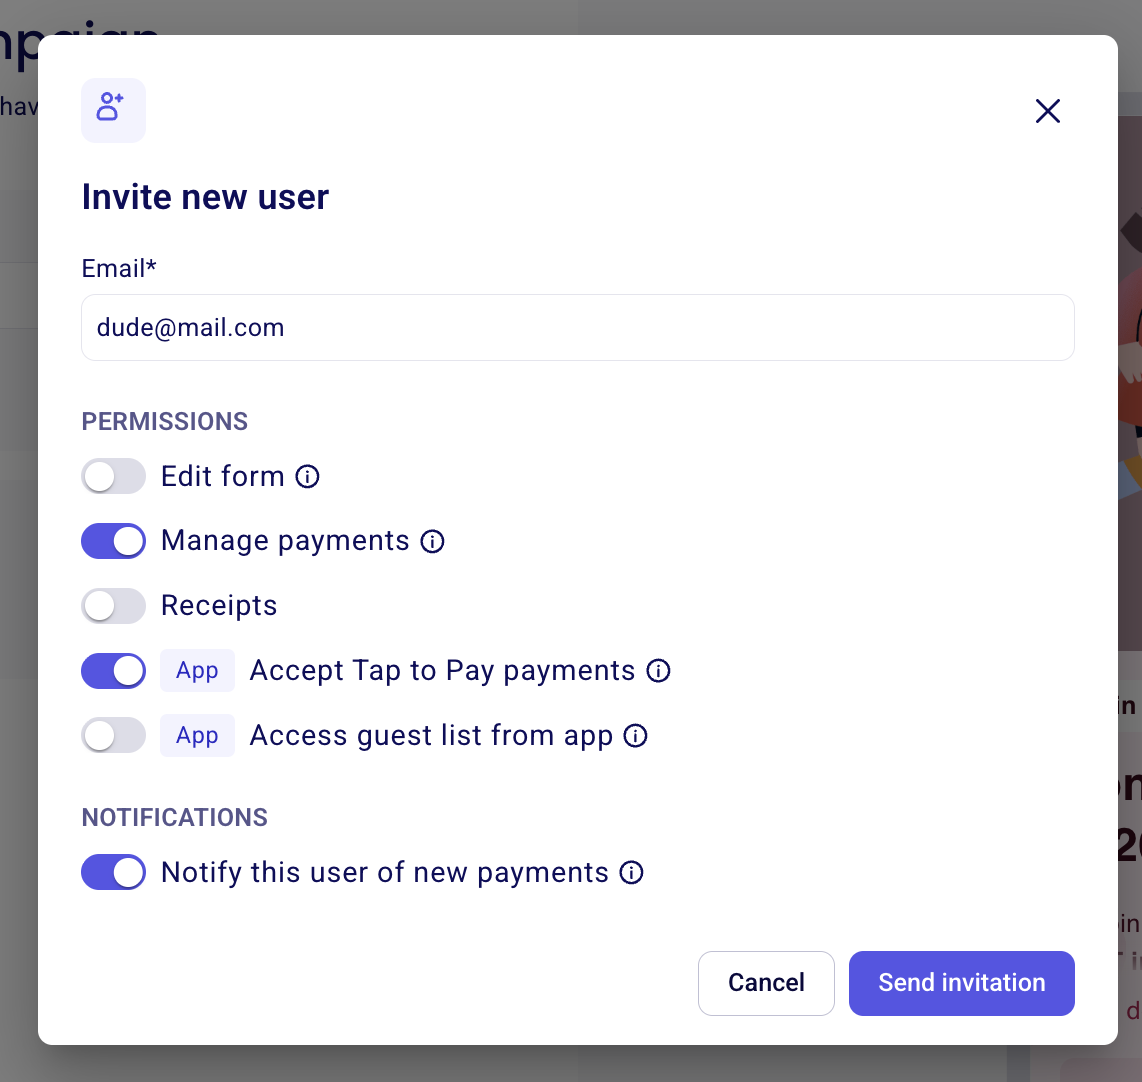
Step 11: Invite collaborators
Invite other members of your organization to collaborate on this campaign with you. You can also add additional emails to receive notifications of new donations. To learn more about user permissions, click here.
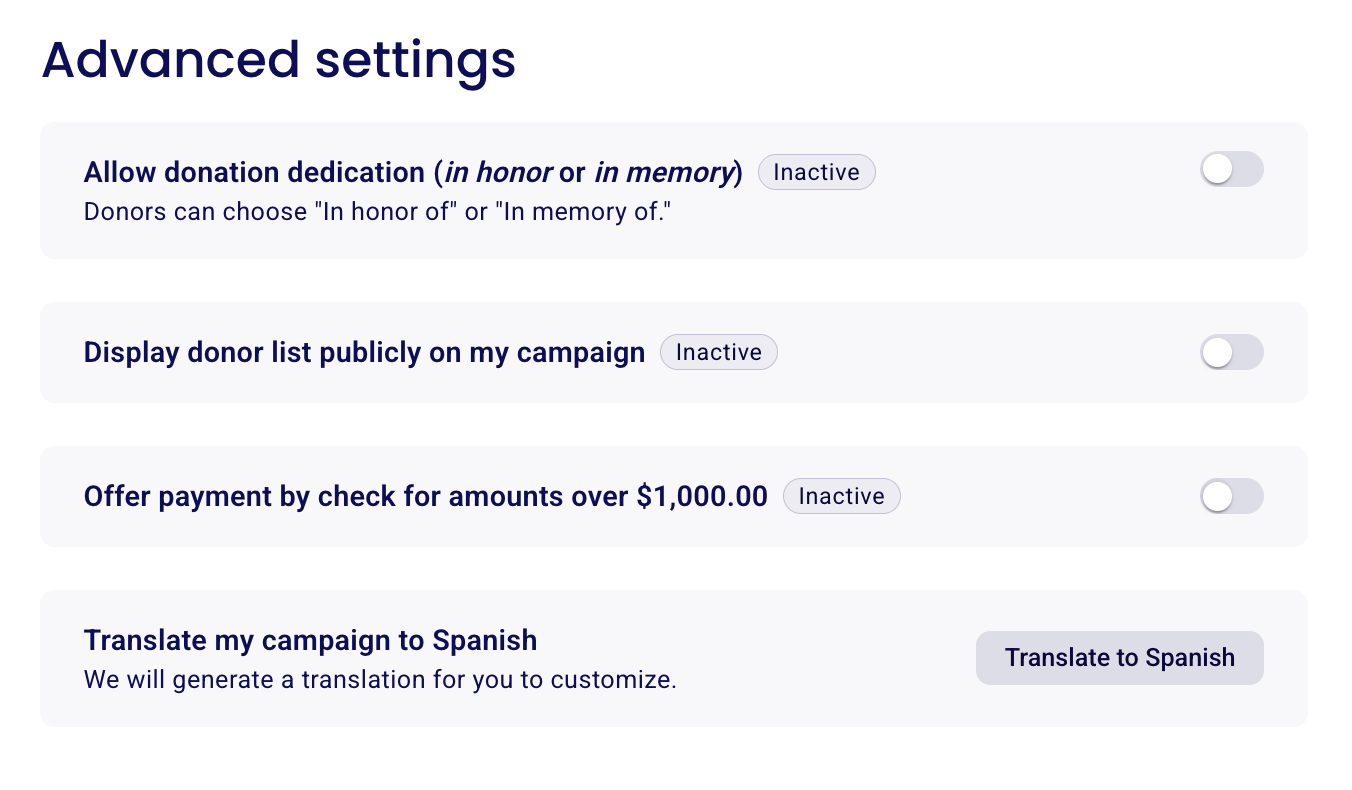
Step 12: Advanced Settings
In the advanced settings, you can:
Enable honorary or memorial donations — donors can choose to give in honor or in memory of someone
Display donors publicly on your campaign page — donors will always have the option to remain anonymous if this is turned on
Enable check donations for donations over $1,000
Translate your form to Spanish (US) or French (CA)
Share Your Campaign with Your Community
Once your campaign is ready you can
Click "View my campaign" to view it as a donor or make your first donation
Click "Share my campaign" to access various sharing options. Click here to learn more about form sharing.
Click "Setup campaign communications" to share the campaign with your community using Zeffy's emailing tool. Click here to learn more about emailing.
Common questions and feature requests
Is it possible to customize the "Donate" button on the donation form checkout process?
Unfortunately, this can't be changed at this time. While this feature is not yet available, we continue to prioritize enhancing your experience, and our development team is consistently working to improve the platform. New features are released on a weekly basis to help address your needs. Upvote for this request here.
Can my donors set up a weekly recurring donation?
Zeffy currently supports one-time, monthly, quarterly and yearly donation frequencies. To allow donors to give on a weekly basis, we recommend helping them setup 4 monthly donations, one for each week of the month. Once the first 4 donations have been made, the donor will no longer have to initiate a new donation, as those 4 monthly donations will roll automatically.
Vote on this feature request here to help our team prioritize your suggestion, and you'll be informed via email with any updates on its implementation.