
Creating and configuring an auction page on Zeffy
You can view a full tutorial of how to set up an auction form, what the bidding experience looks like and how to track bids and payments in Zeffy here:
⚠️ This video was filmed on a previous version of the platform - there is now a limit of 50 items per auction form.
Zeffy's auction form
With our auction forms, your supporters can effortlessly place bids on one or multiple auction items. Each bid is instantly recorded and displayed on your dashboard, allowing you to track your bids in real time.
Users don't have to sign up or sign in to make their bid, all they need is their contact and payment information.
Once the auction close date & time that you selected in your form configuration passes and the auction concludes, winning bids are automatically processed for payment, with the transactions appearing in your dashboard. You won't have to run after your bidders – they will be charged automatically if they win.
The winning bidder will automatically receive a confirmation of their win and a receipt via email. You can customize the email they receive beforehand.
All bidders who did not win the item(s) they bid on will receive a personalized email as well, thanking them for their participation. This is a great opportunity to re-engage your supporters and invite them to donate to your organization, even if they didn't win.
Just like the rest of our platform, our auction tool is 100% free. We even cover credit card fees meaning you will keep every single dollar that you raise.
Other Features offered by our silent auction forms
📅 Set an automatic end date for your auction. Bids will open at the pre-configured open date and bids will close once your close date passes.
🖼️ Add up to 50 items with associated images
📍 Set a pick-up location so that your supporters automatically know where their items can be picked up (if applicable)
💰 Set a starting bid. This is the minimum amount that can be bid by participants.
➕ Set a minimum bid increment. This is the smallest amount by which a bid must increase in order to be accepted.
❓Ask your supporters custom questions to collect additional information during their bidding process.
📧 Customize the emails sent to your winners as well as supporters that did not win any items.
🔔 Configure and automate a reminder email to remind your supports to place their final bids
📧 Automatic email notifications to bidders when they are outbid
Having the option for bidders to pay in cash
Create your auction:
Log into your Zeffy dashboard on a computer.
Click on "Fundraising" in the menu bar on the left and then on "Campaigns"
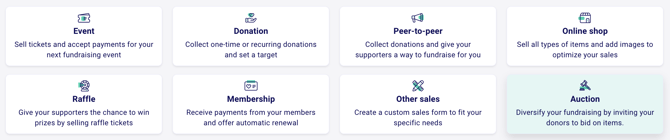
There, click on "+ New form" in the top right and select the event option.
Select "Auction" from the form type options
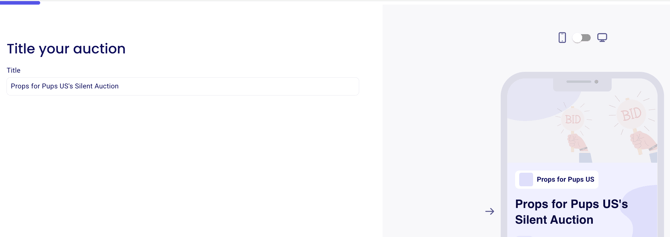
1) Describe your auction and set an open and end date
Enter your auction title. Click "Next" to continue to the next step!
2) Set close date & time of your auction
At the bottom of the page, set an end date of your auction. Once the end date and time pass, your form will no longer accept bids.
Payments for the winning bid(s) for each item will automatically be processed at the auction end date and time.
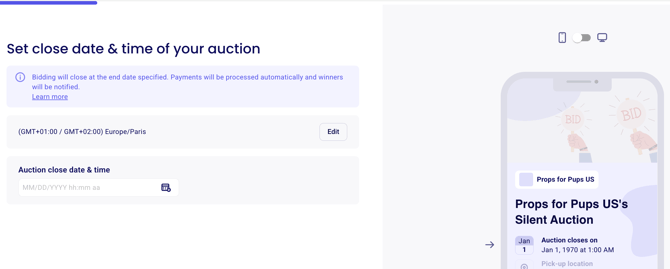
Please note bidding begins as soon as you share your form with supporters. Currently, there is no option to set a 'start date' for bidding, but if you find this feature useful, please upvote and comment to help us prioritize it here.
On the next page you'll also be able to add a pickup location (if applicable). Click Skip for Now at the bottom if this is not applicable to you.
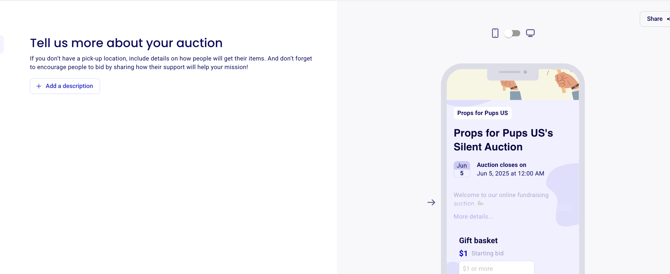
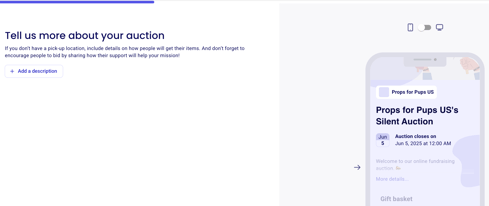
3) Describe your auction
Here you can add a detailed description of your auction. If you don’t have a pick-up location, include details on how people will get their items. And don’t forget to encourage people to bid by sharing how their support will help your mission!
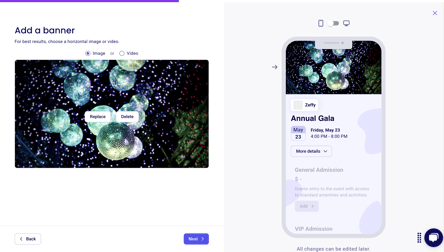
4) Customize the look of your auction
Select your form color scheme by clicking on the the dropper icon to start.
On the next page, add a banner image (16:9 ratio recommended) or YouTube video (by pasting the URL) at the top of your form.
Please note: YouTube shorts are not supported at this time.
Upload your nonprofit's logo (it will appear in top left corner, next to your organization name). A square image, with a 1:1 ratio is recommended for your logo!
5) List your auction items
Here, you'll be able to add the different items being auctioned off.
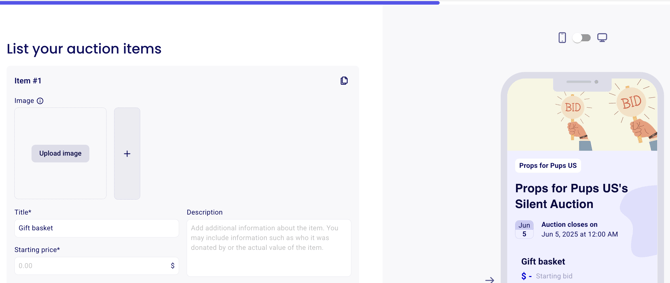
You'll be able to name the item, define the starting bid, and define the minimum bid increment.
The starting bid is the price at which bidding will start. No supporter will be able to bid below the starting bid.
The minimum bid increment is the smallest amount by which a bid must increase in order to be accepted. If left blank, the minimum increment will be 1$. The minimum increment does not apply to the first bid placed.
You can add up to 50 items by clicking "+ Add another item" in the bottom left.
⚠️ Each Zeffy auction form allows up to 200 items. If you try to add more, the system will display an error. Plan your auction within this limit for the best experience!
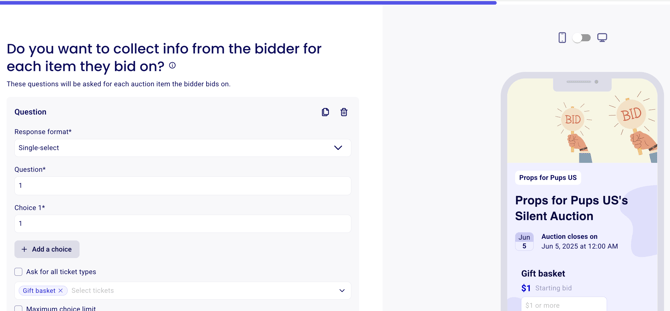
6)❓Ask your supporters custom questions:
On this page you can add questions to be asked for each auction item the bidder bids on. If a supporter bids on three items, for example, they will be asked this question three times.
Choose response formats (single select, multiple choice, checkbox, etc.)
Set whether questions apply to all items or specific ones
Make questions required if needed (meaning a bid cannot be placed without answering it).
Set maximum choice limits. Setting a maximum choice limit will limit the number of times this answer can be selected. The option will be greyed out when the limit is reached.
On the next page, you can add questions to collect additional info from the bidder only. The questions in this section will only be asked once per purchase.
Click on "Next" in the bottom left of this page once you're done adding your questions.
7) Edit Thank you emails
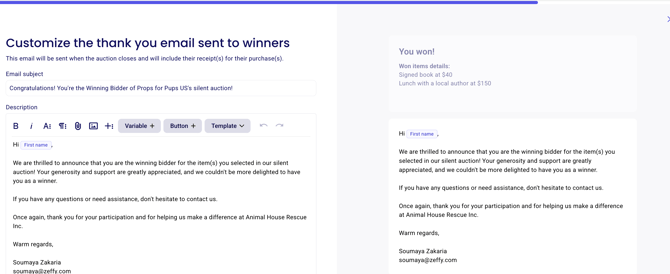
Thank you email sent to winners - On this page you can edit the email sent to the winning bidder after the auction has closed. This email will also include their receipt(s) for their purchase(s). See a preview of the email on the right! Click next once done.
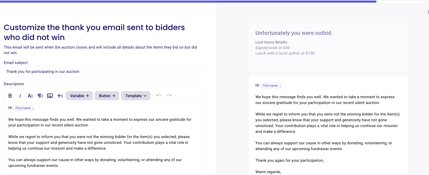
Thank you email sent to bidders who did not win - This is the email sent to the bidders that did not win once the auction is closed. All details about the items they bid on but did not win will be included in the email.
8) Advanced Settings
In your advanced settings, you'll be able to:
Allow offline payments. Toggle this option on to allow bidders to participate without entering their payment information. In this scenario:
Bidders can submit their bids without providing payment information.
If they win an item, they will not be automatically charged.
Winners must complete their payment outside of the Zeffy platform.
By enabling cash/offline bids, you provide more flexibility to your bidders and accommodate those who prefer not to use online payment methods.
💡 For more information on how offline payments work please see our detailed guide here!
Add your email in the notification field so that you can be notified each time somebody makes a bid on your auction form.
Enable form translation (Spanish for US, French for Canada).
Once your form configuration has been finalized and you're ready for it to be publicized, you'll be able to share it with your community. To learn how to share your form, consult the instructions here: Sharing your Zeffy form.